<?xml version="1.0" encoding="utf-8"?><?xml-stylesheet type="text/xsl" href="atom.xsl"?>
<feed xmlns="http://www.w3.org/2005/Atom">
    <id>https://docs.kamoji.bot/blog</id>
    <title>Kamoji Docs Blog</title>
    <updated>2026-08-17T00:00:00.000Z</updated>
    <generator>https://github.com/jpmonette/feed</generator>
    <link rel="alternate" href="https://docs.kamoji.bot/blog"/>
    <subtitle>Kamoji Docs Blog</subtitle>
    <icon>https://docs.kamoji.bot/img/kamoji-favicon.ico</icon>
    <entry>
        <title type="html"><![CDATA[The 19-month pause, and rebuilding Kamoji on ESPHome]]></title>
        <id>https://docs.kamoji.bot/blog/kamoji-esphome-rebuild</id>
        <link href="https://docs.kamoji.bot/blog/kamoji-esphome-rebuild"/>
        <updated>2026-08-17T00:00:00.000Z</updated>
        <summary type="html"><![CDATA[The last photos and videos from Kamoji's first development phase are dated]]></summary>
        <content type="html"><![CDATA[<p>The last photos and videos from Kamoji's first development phase are dated
May 15, 2024. After that, the project went quiet for nineteen months — not
abandoned, but paused while we rethought how we were actually building it.</p>
<!-- -->
<h2 class="anchor anchorTargetStickyNavbar_Vzrq" id="what-seven-months-of-manual-c-got-us-and-what-it-cost">What seven months of manual C++ got us, and what it cost<a href="https://docs.kamoji.bot/blog/kamoji-esphome-rebuild#what-seven-months-of-manual-c-got-us-and-what-it-cost" class="hash-link" aria-label="Direct link to What seven months of manual C++ got us, and what it cost" title="Direct link to What seven months of manual C++ got us, and what it cost" translate="no">​</a></h2>
<p>By May 2024, a small team — a handful of developers — had built an
ESP32-S3 system with IMU-driven driving state detection, a working TFT
display with animated faces, a custom PCB at Revision 4, audio output, touch
sensing, and real in-car testing. Every driver, every state machine, every
display routine, written by hand in C++.</p>
<p>It worked, but it was slow to extend. Adding a feature meant a deep C++ dive.
Testing meant reflashing hardware. The iteration loop that felt fast in
October 2023 had gotten heavy eighteen months later. Hardware stayed parked
at PCB Revision 4.</p>
<h2 class="anchor anchorTargetStickyNavbar_Vzrq" id="why-esphome">Why ESPHome<a href="https://docs.kamoji.bot/blog/kamoji-esphome-rebuild#why-esphome" class="hash-link" aria-label="Direct link to Why ESPHome" title="Direct link to Why ESPHome" translate="no">​</a></h2>
<p>Near the end of 2025, unrelated to Kamoji at first, we started exploring
whether our decade-old custom IoT stack — the smart home and office
automation systems Originally US runs internally — could move onto
established open-source platforms: <strong>Home Assistant</strong> and <strong>ESPHome</strong>.
Maintaining custom firmware at scale is a tax on a consultancy's time, and
the open-source ecosystem had matured enough that moving made sense.</p>
<p>That exploration fed straight back into Kamoji. If the goal was
maker-friendly and open-source, ESPHome was the better fit than Arduino: a
broader community, declarative YAML configuration instead of raw C++ for the
basics, and built-in OTA, WiFi provisioning and sensor abstractions that
Kamoji needed anyway. The decision was made: when Kamoji restarted, it would
be rebuilt from scratch on ESPHome.</p>
<h2 class="anchor anchorTargetStickyNavbar_Vzrq" id="writing-firmware-with-an-ai-toolchain">Writing firmware with an AI toolchain<a href="https://docs.kamoji.bot/blog/kamoji-esphome-rebuild#writing-firmware-with-an-ai-toolchain" class="hash-link" aria-label="Direct link to Writing firmware with an AI toolchain" title="Direct link to Writing firmware with an AI toolchain" translate="no">​</a></h2>
<p>The other thing that had changed was how we wrote code. A few months before
restarting Kamoji, the team had started using ChatGPT to help write ESPHome
YAML for simpler IoT boards — single-file configs for basic switches and
sensors. Low complexity, but it worked, and it was how we learned the
ESPHome model in parallel with experimenting with AI-assisted development.</p>
<p>Then Google Antigravity launched, with the ability to reason across
multi-file codebases and help design custom ESPHome components in C++. That
made it possible to apply the same approach to something as complex as
Kamoji — work that would have taken months by hand became tractable in days.
The ESPHome migration and Antigravity as the tool for it are what unlocked
the project's second phase.</p>
<h2 class="anchor anchorTargetStickyNavbar_Vzrq" id="what-that-pace-actually-looked-like">What that pace actually looked like<a href="https://docs.kamoji.bot/blog/kamoji-esphome-rebuild#what-that-pace-actually-looked-like" class="hash-link" aria-label="Direct link to What that pace actually looked like" title="Direct link to What that pace actually looked like" translate="no">​</a></h2>
<p>The new ESPHome repository was created on December 24, 2025. We set up
auto-commit so that every file save during development pushed to git,
turning the log into a continuous trace of the work rather than milestone
markers.</p>
<p><strong>469 commits in the first week.</strong> Multiple YAML configurations ran in
parallel from day one — different display setups, different microphone
configurations, experiments that would have needed sequential weeks in the
manual era running side by side instead.</p>
<p>January 2026 was the busiest month in the project's history: <strong>718 commits</strong>,
including <strong>91 in a single day</strong> — January 19, a Sunday. <code>kamoji-production.yaml</code>
appeared on January 10, the first config explicitly labelled for production
hardware. Two of the more complex pieces of the system, <code>kamoji_fft_audio_processor</code>
and <code>kamoji_gif_player</code>, showed up by late January — the audio processor
analysing microphone input in real time to detect music and sound events, the
GIF player rendering animated sequences on the display at high frame rate.</p>
<p>By February 12, <code>kamoji-core.yaml</code> — the 2,781-line master configuration
that became Kamoji's brain — existed. In April the codebase was reorganised
out of that monolith into 19 discrete custom components, each with its own
interface and independent testing: <code>kamoji_imu</code>, <code>kamoji_gforce</code>,
<code>kamoji_dynamic_eyes</code>, <code>kamoji_espnow</code>, <code>kamoji_ui_navigation</code>, and more. That's
the kind of restructuring you do when you expect other people to maintain,
extend and contribute to the code — which was the point of moving to ESPHome
in the first place.</p>
<p>This is the third post in a series on how Kamoji got built. Next: <a class="" href="https://docs.kamoji.bot/blog/kamoji-feature-philosophy">why Kamoji
works the way it does — no touchscreen, offline by default, and where the
ferrofluid visualizer came from</a>.</p>]]></content>
        <author>
            <name>Kamoji Team</name>
            <uri>https://docs.kamoji.bot</uri>
        </author>
        <category label="Kamoji" term="Kamoji"/>
        <category label="Open Source" term="Open Source"/>
        <category label="ESPHome" term="ESPHome"/>
    </entry>
    <entry>
        <title type="html"><![CDATA[Why Kamoji works the way it does]]></title>
        <id>https://docs.kamoji.bot/blog/kamoji-feature-philosophy</id>
        <link href="https://docs.kamoji.bot/blog/kamoji-feature-philosophy"/>
        <updated>2026-08-17T00:00:00.000Z</updated>
        <summary type="html"><![CDATA[Every significant feature decision in Kamoji has a reason behind it, and a]]></summary>
        <content type="html"><![CDATA[<p>Every significant feature decision in Kamoji has a reason behind it, and a
few of them are the opposite of what you'd expect from a car gadget in 2026.
Here's why they're built the way they are.</p>
<!-- -->
<h2 class="anchor anchorTargetStickyNavbar_Vzrq" id="no-touchscreen">No touchscreen<a href="https://docs.kamoji.bot/blog/kamoji-feature-philosophy#no-touchscreen" class="hash-link" aria-label="Direct link to No touchscreen" title="Direct link to No touchscreen" translate="no">​</a></h2>
<p>This was decided early and never revisited. The reference point was cheap
smartwatches with tiny touchscreens: imprecise, quick to pick up
fingerprints, and a category that shows exactly why a touchscreen isn't
always the right interface on a small device. Physical buttons are more
reliable and more appropriate for something that lives in a car, where your
attention should be on the road rather than on hitting a target on glass.
It's also consistent with where automotive interiors are heading generally —
manufacturers went from buttons to touchscreens and are now moving back
toward physical controls.</p>
<h2 class="anchor anchorTargetStickyNavbar_Vzrq" id="offline-by-default">Offline by default<a href="https://docs.kamoji.bot/blog/kamoji-feature-philosophy#offline-by-default" class="hash-link" aria-label="Direct link to Offline by default" title="Direct link to Offline by default" translate="no">​</a></h2>
<p>There's a category of product that's essentially an open-source AI assistant
in small-robot form — always-on cloud connectivity, voice recognition, the
works. We looked at that category and decided against it: always-listening
microphones raise real privacy questions, and depending on a cloud service
means depending on its uptime, its latency, its API costs, and its continued
existence. Kamoji is designed to be a fully standalone, offline experience —
plug in power and it works, no WiFi setup, no account.</p>
<p>That doesn't rule the option out for people who want it. Kamoji's
architecture is open-source and the hardware can support it — makers who
want to build an AI assistant on top of the board can, and we've published a
tutorial showing how: <a class="" href="https://docs.kamoji.bot/docs/modding/xiaozhi-voice-assistant">XiaoZhi on Kamoji: voice assistant firmware, end to
end</a>. We just don't think it should be
the default for everyone.</p>
<h2 class="anchor anchorTargetStickyNavbar_Vzrq" id="the-ferrofluid-visualizer">The ferrofluid visualizer<a href="https://docs.kamoji.bot/blog/kamoji-feature-philosophy#the-ferrofluid-visualizer" class="hash-link" aria-label="Direct link to The ferrofluid visualizer" title="Direct link to The ferrofluid visualizer" translate="no">​</a></h2>
<p>Ferrofluid is a magnetic liquid that forms spikes and flows in response to
sound and motion — a niche product most people have never encountered,
because ferrofluid displays are expensive and rare. There isn't a digital
ferrofluid simulation that does the effect justice, so Kamoji doesn't try to
simulate the fluid itself. It uses a metaball simulation instead, which
produces visually similar organic, flowing forms in real time on the
display. Most people who see it won't know what they're looking at
technically. That's fine — the effect is the point.</p>
<h2 class="anchor anchorTargetStickyNavbar_Vzrq" id="takumis-cup-challenge">Takumi's Cup Challenge<a href="https://docs.kamoji.bot/blog/kamoji-feature-philosophy#takumis-cup-challenge" class="hash-link" aria-label="Direct link to Takumi's Cup Challenge" title="Direct link to Takumi's Cup Challenge" translate="no">​</a></h2>
<p>The metaball work proved what the display could do with particle effects,
which led to a full fluid simulation driven by the gyro sensor: the
<a class="" href="https://docs.kamoji.bot/blog/cup-of-water-test">Cup of Water Test</a>, run inside the device itself.
We started with a flat water surface that tilted with the gyro reading, then
kept pushing toward more realistic fluid behaviour — under one constraint
throughout: the water had to look and behave like liquid <em>and</em> be fun to
watch, not just physically accurate. Getting both at once took a lot of
iteration.</p>
<h2 class="anchor anchorTargetStickyNavbar_Vzrq" id="g-force-without-pretending-to-be-a-lab-instrument">G-force, without pretending to be a lab instrument<a href="https://docs.kamoji.bot/blog/kamoji-feature-philosophy#g-force-without-pretending-to-be-a-lab-instrument" class="hash-link" aria-label="Direct link to G-force, without pretending to be a lab instrument" title="Direct link to G-force, without pretending to be a lab instrument" translate="no">​</a></h2>
<p>G-force sensors show up almost exclusively as factory-fitted systems in
high-end vehicles — there's no real aftermarket accessory market for them.
Kamoji has one, and it isn't lab-grade: the reading depends on where the
device sits in the car, how it's oriented, and other variables that aren't
controlled for. It doesn't need to be scientifically precise to be useful.
It's accurate enough to compare meaningfully between vehicles and to show
how a driving style changes the numbers on the same car — which is
essentially what it's for. We expect owners to compare scores and argue
about them.</p>
<h2 class="anchor anchorTargetStickyNavbar_Vzrq" id="ota-updates-without-a-mandatory-app">OTA updates, without a mandatory app<a href="https://docs.kamoji.bot/blog/kamoji-feature-philosophy#ota-updates-without-a-mandatory-app" class="hash-link" aria-label="Direct link to OTA updates, without a mandatory app" title="Direct link to OTA updates, without a mandatory app" translate="no">​</a></h2>
<p>Kamoji works fully without a phone, an app, or a cloud account. OTA firmware
updates exist and reach every unit in the field, but they're opt-in, with no
subscription attached. The OTA system itself isn't new: it's the same
deployment infrastructure that already runs across hundreds of Originally
US's own IoT installations, refined over more than a decade of keeping those
systems running in production. That's an unusual decision for a mobile app
company to make — an app that's genuinely optional — but it's the one that
matches how Kamoji is supposed to work.</p>
<p>This is the fourth post in a series on how Kamoji got built. Next: <a class="" href="https://docs.kamoji.bot/blog/kamoji-helmet-design">learning
industrial design from scratch, to get the helmet
right</a>.</p>]]></content>
        <author>
            <name>Kamoji Team</name>
            <uri>https://docs.kamoji.bot</uri>
        </author>
        <category label="Kamoji" term="Kamoji"/>
        <category label="Driving" term="Driving"/>
        <category label="G-Force" term="G-Force"/>
        <category label="Physics" term="Physics"/>
    </entry>
    <entry>
        <title type="html"><![CDATA[Designing the Kamoji helmet from scratch]]></title>
        <id>https://docs.kamoji.bot/blog/kamoji-helmet-design</id>
        <link href="https://docs.kamoji.bot/blog/kamoji-helmet-design"/>
        <updated>2026-08-17T00:00:00.000Z</updated>
        <summary type="html"><![CDATA[By March 2026, Kamoji's inner structural frame was more or less settled. The]]></summary>
        <content type="html"><![CDATA[<p>By March 2026, Kamoji's inner structural frame was more or less settled. The
next problem was one nobody on the team had any experience with at all:
industrial design.</p>
<!-- -->
<h2 class="anchor anchorTargetStickyNavbar_Vzrq" id="the-bar-we-set">The bar we set<a href="https://docs.kamoji.bot/blog/kamoji-helmet-design#the-bar-we-set" class="hash-link" aria-label="Direct link to The bar we set" title="Direct link to The bar we set" translate="no">​</a></h2>
<p>We're used to designing technical components — PCBs, structural frames,
sensor mounts, assembly tolerances. None of that translates to designing a
product's outer form: curved surfaces, a silhouette that communicates
personality, a shape that invites touch. That's a different discipline, and
we had none of it going in.</p>
<p>The requirements were deliberately demanding. The helmet needed to be
timeless rather than a trend that dates itself in two years. It needed to
read across cultures and age groups. It had to be clearly its own thing, not
a derivative of a competitor's shape. It had to be swappable, the way
competing products let you customise the shell. And — for the maker and
open-source angle — it had to be printable on an entry-level consumer 3D
printer, no exotic materials or equipment required.</p>
<h2 class="anchor anchorTargetStickyNavbar_Vzrq" id="where-external-designers-didnt-work-and-where-sketches-did">Where external designers didn't work, and where sketches did<a href="https://docs.kamoji.bot/blog/kamoji-helmet-design#where-external-designers-didnt-work-and-where-sketches-did" class="hash-link" aria-label="Direct link to Where external designers didn't work, and where sketches did" title="Direct link to Where external designers didn't work, and where sketches did" translate="no">​</a></h2>
<p>We brought in external industrial designers to explore concepts first. It
didn't go well — the results either missed the timeless, cross-cultural
brief, the character didn't read right, or the geometry didn't work with the
inner frame's physical constraints. We came away with a clear list of what
we didn't want, which is something, but not what we needed.</p>
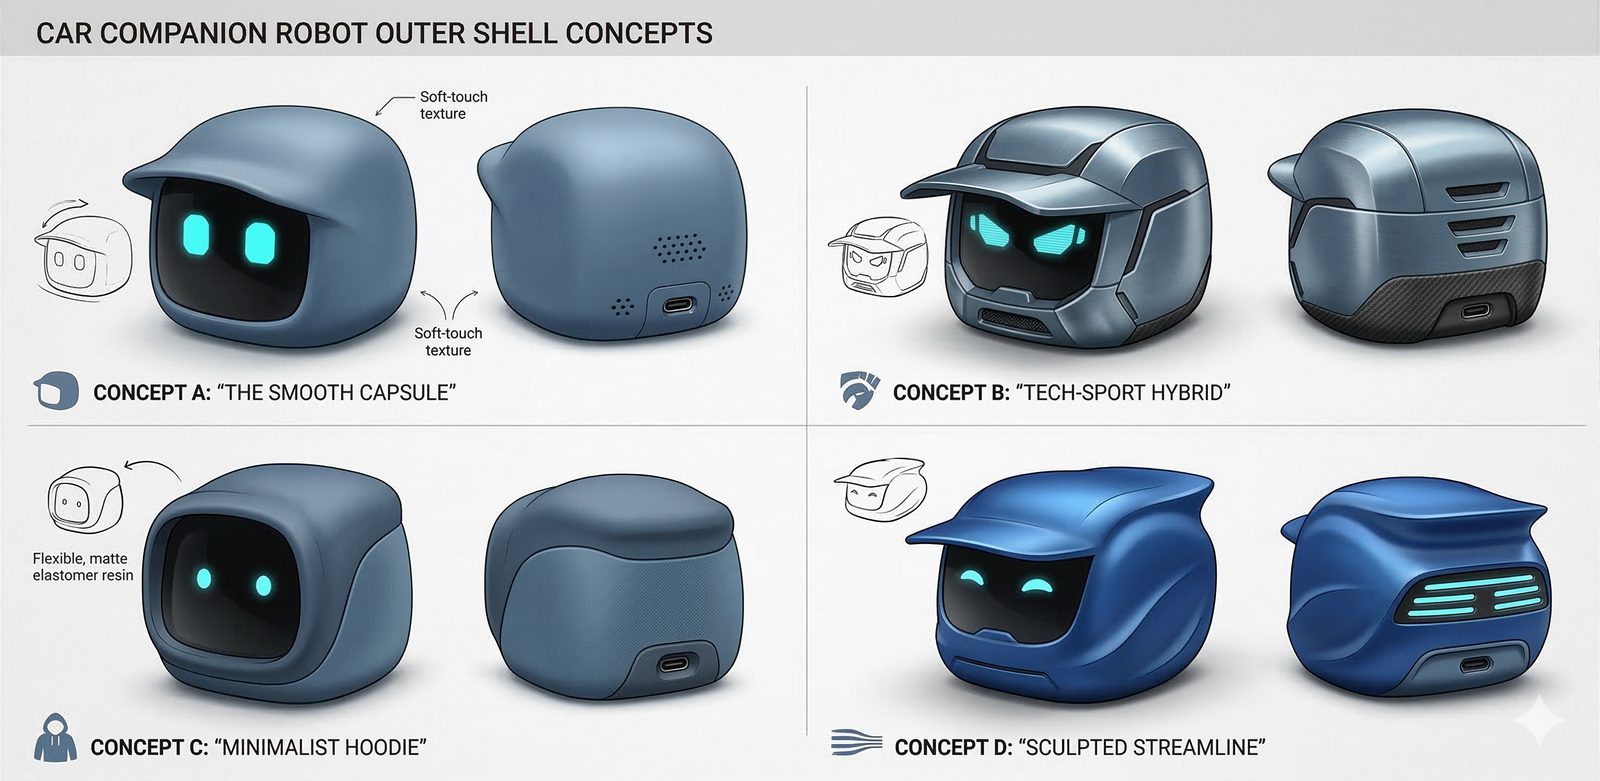
<p>The actual breakthrough came from hand-drawn sketches on paper, fed into AI
image generation tools to produce polished visual concepts from the rough
gesture of each sketch. It worked immediately — a range of directions to
react to and choose between, at a pace no single designer could match on
their own.</p>
<p><img decoding="async" loading="lazy" alt="AI-generated concept sheet showing four helmet design directions: Smooth Capsule, Tech-Sport Hybrid, Minimalist Hoodie, Sculpted Streamline" src="https://docs.kamoji.bot/assets/images/ai-concept-sheet-2be666100a69fa62e08daddfce5b7884.jpg" width="1600" height="781" class="img_ev3q"></p>
<p>Concept images aren't CAD models, though — no tolerances, no wall
thicknesses, no assembly logic. The next step was a human designer taking
the chosen direction and turning it into real geometry: a file we could pull
dimensions from, iterate on, and eventually send to a printer.</p>
<h2 class="anchor anchorTargetStickyNavbar_Vzrq" id="kodo-as-the-filter">Kodo as the filter<a href="https://docs.kamoji.bot/blog/kamoji-helmet-design#kodo-as-the-filter" class="hash-link" aria-label="Direct link to Kodo as the filter" title="Direct link to Kodo as the filter" translate="no">​</a></h2>
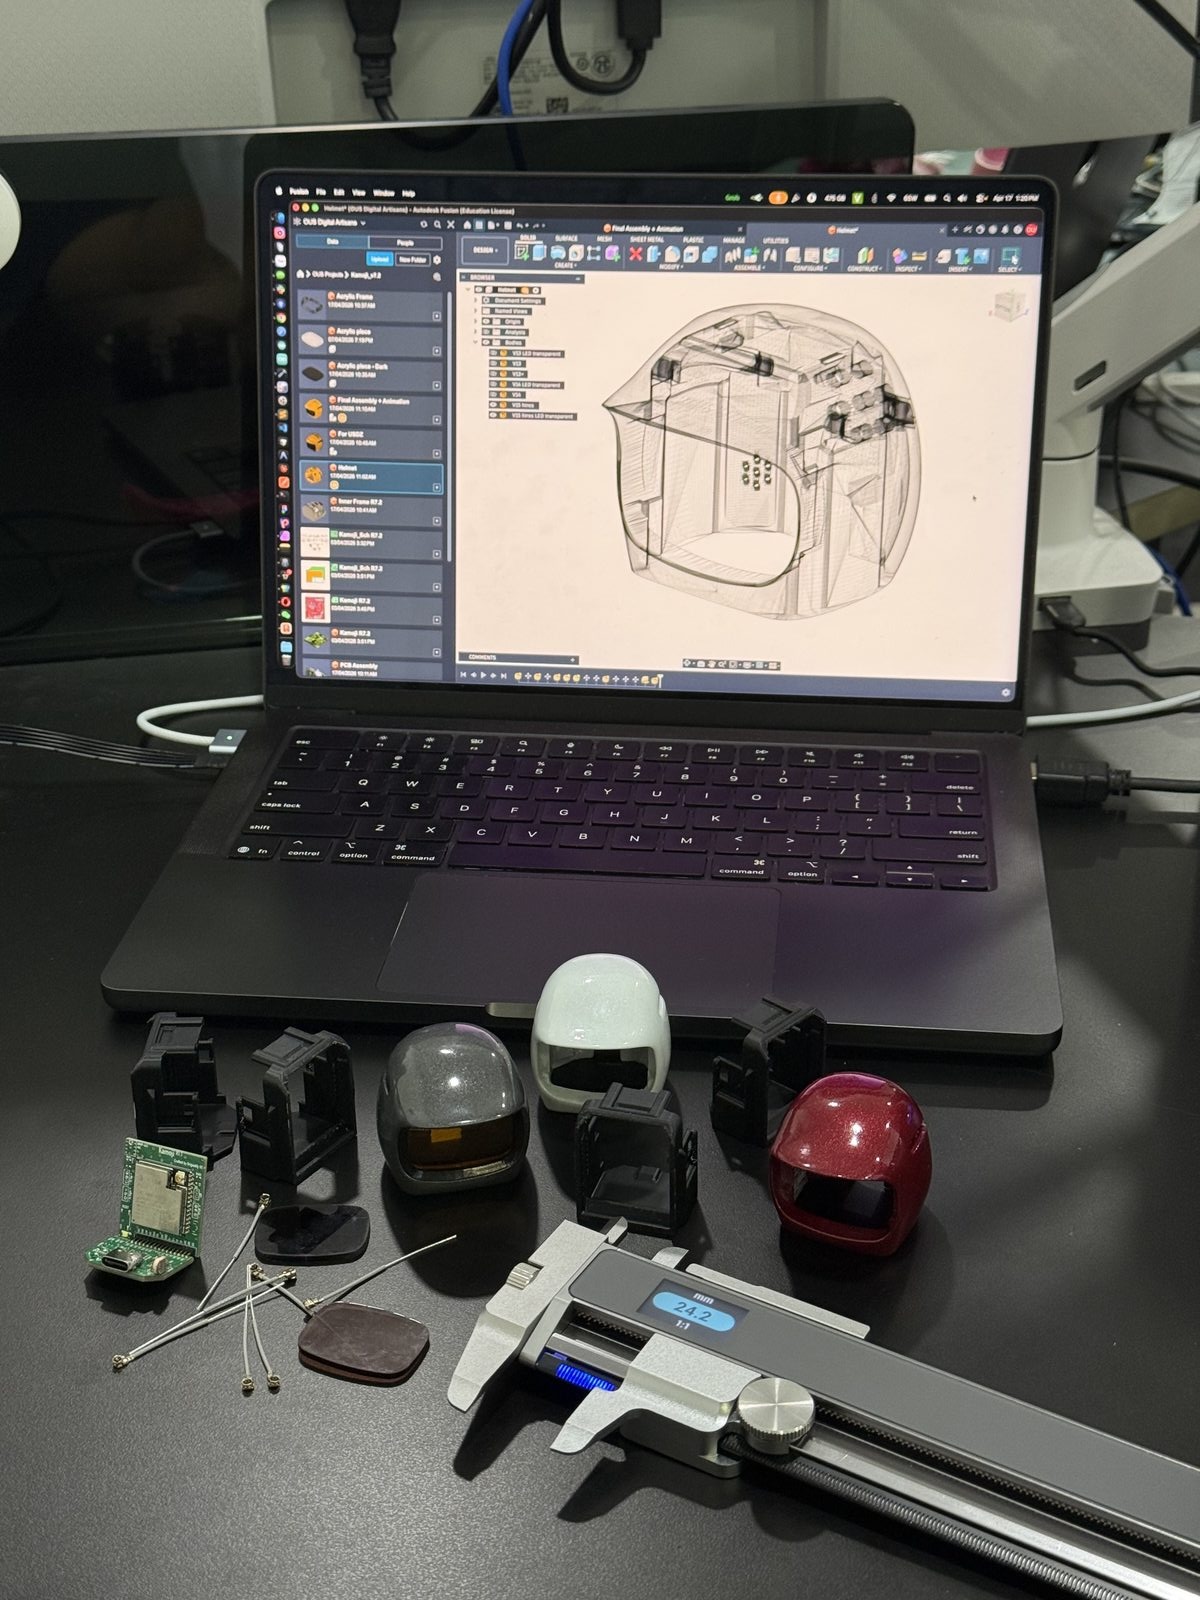
<p>For the CAD refinement stage, we used Mazda's <em>Kodo — Soul of Motion</em> design
philosophy as a reference: no sharp edges, surfaces that flow into each
other, lines with direction and tension, as if caught mid-movement. Every
decision in refinement ran through that filter — a hard transition got
softened, a line that broke the flow got rethought. Having a named design
language to check against kept the iteration focused instead of open-ended.</p>
<p><img decoding="async" loading="lazy" alt="CAD cross-section of the Kamoji helmet interior open on screen, with physical prototypes in multiple colorways alongside a digital caliper" src="https://docs.kamoji.bot/assets/images/cad-refinement-c56a6d1c4556d12e3a2cd3f7f7a13bb9.jpg" width="1200" height="1600" class="img_ev3q"></p>
<h2 class="anchor anchorTargetStickyNavbar_Vzrq" id="fitting-the-shell-to-whats-inside-it">Fitting the shell to what's inside it<a href="https://docs.kamoji.bot/blog/kamoji-helmet-design#fitting-the-shell-to-whats-inside-it" class="hash-link" aria-label="Direct link to Fitting the shell to what's inside it" title="Direct link to Fitting the shell to what's inside it" translate="no">​</a></h2>
<p>The visual design being finalised was only part of the problem. The helmet
also had to physically fit over the inner frame, align with the display
window, and click into place with a precise, satisfying snap. That took its
own round of iteration — print a prototype, check the fit, adjust
tolerances, print again. Most prototypes had at least one thing wrong. Each
one told us something.</p>
<p>Everything was finalised in May 2026, about two months after the industrial
design work started.</p>
<p>This is the fifth post in a series on how Kamoji got built. Next: <a class="" href="https://docs.kamoji.bot/blog/kamoji-manufacturing-and-launch">scaling
from 200 hand-checked units to a manufacturing partner, and what changed
along the way</a>.</p>]]></content>
        <author>
            <name>Kamoji Team</name>
            <uri>https://docs.kamoji.bot</uri>
        </author>
        <category label="Kamoji" term="Kamoji"/>
        <category label="Maker" term="Maker"/>
        <category label="Hardware" term="Hardware"/>
    </entry>
    <entry>
        <title type="html"><![CDATA[From 200 units to a factory floor]]></title>
        <id>https://docs.kamoji.bot/blog/kamoji-manufacturing-and-launch</id>
        <link href="https://docs.kamoji.bot/blog/kamoji-manufacturing-and-launch"/>
        <updated>2026-08-17T00:00:00.000Z</updated>
        <summary type="html"><![CDATA[Late April 2026 was the sprint to launch: colorways settled, a manufacturing]]></summary>
        <content type="html"><![CDATA[<p>Late April 2026 was the sprint to launch: colorways settled, a manufacturing
run underway, and a first real look at what it takes to turn a finished
design into a physical product at scale.</p>
<!-- -->
<h2 class="anchor anchorTargetStickyNavbar_Vzrq" id="settling-on-beige">Settling on beige<a href="https://docs.kamoji.bot/blog/kamoji-manufacturing-and-launch#settling-on-beige" class="hash-link" aria-label="Direct link to Settling on beige" title="Direct link to Settling on beige" translate="no">​</a></h2>
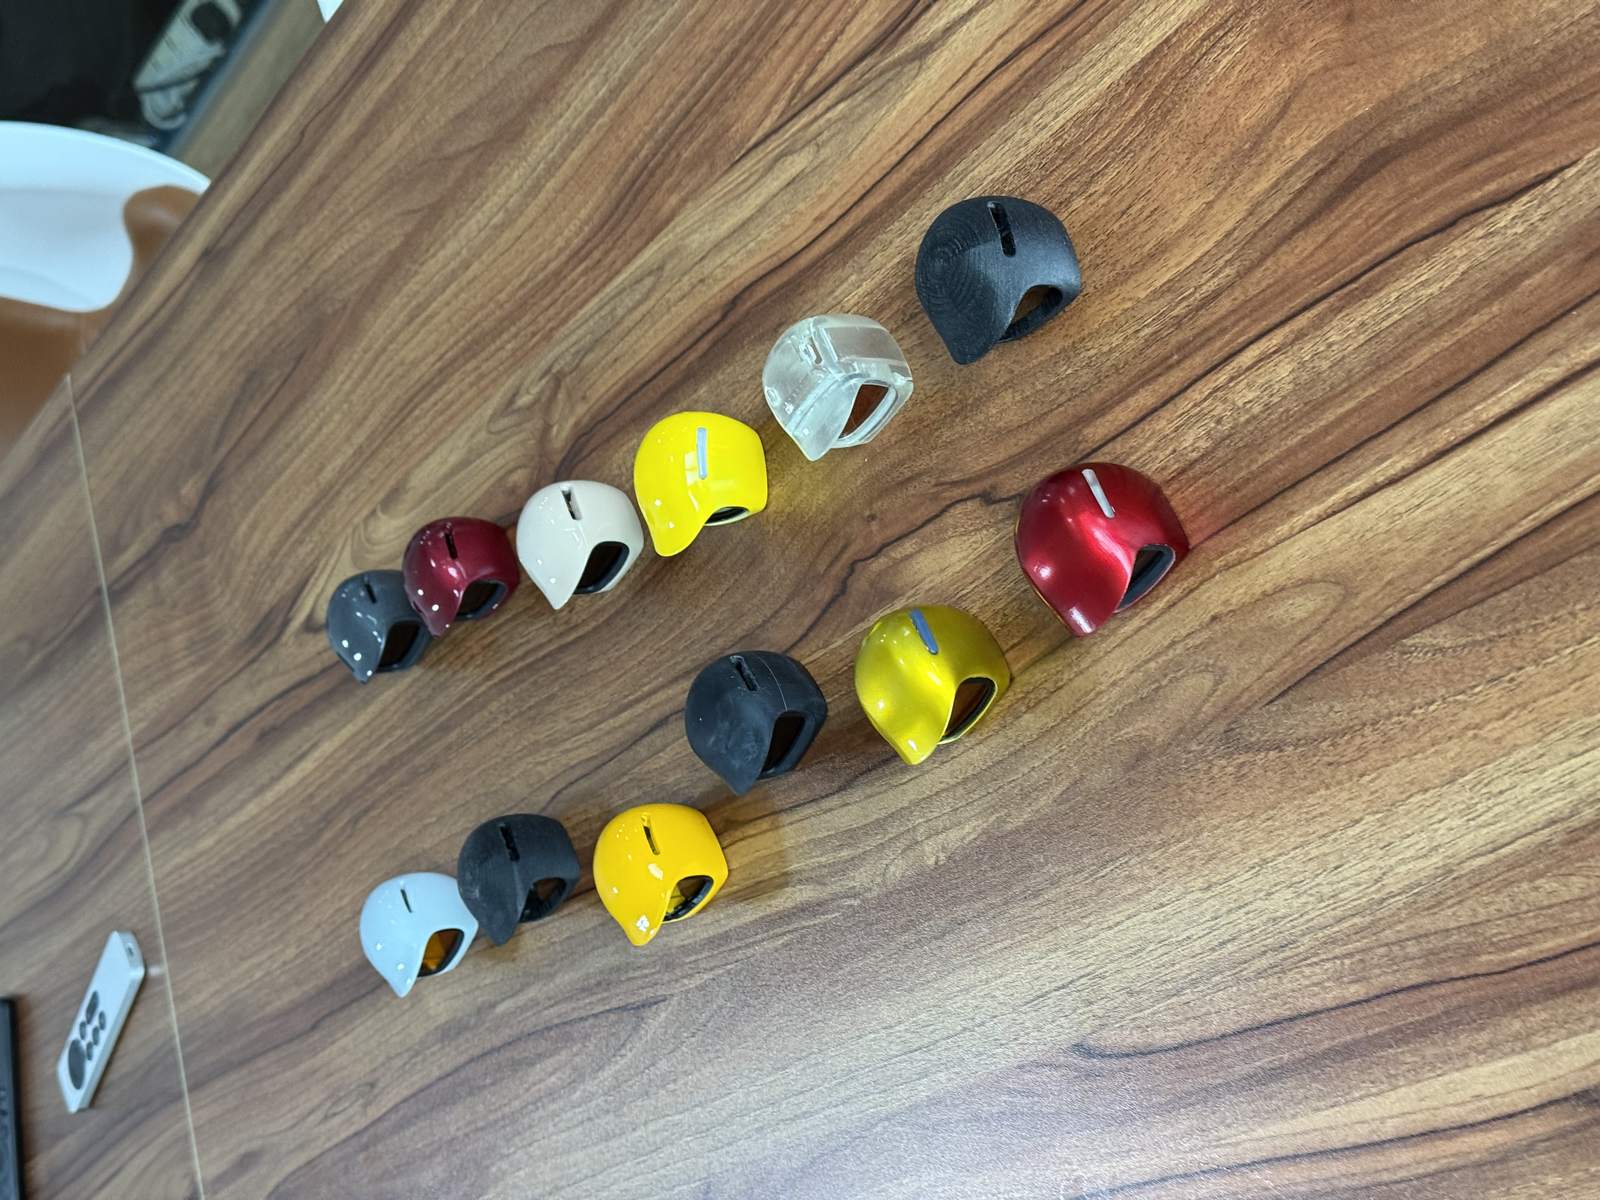
<p>The final weeks of April tested multiple colorways side by side — red with a
yellow visor, white and beige rounded forms, grey and black with red touch
pads — alongside rubber display gaskets at different tolerances.</p>
<p><img decoding="async" loading="lazy" alt="Kamoji helmet colorways laid out — black, white, red, yellow, grey and combinations, exploring the full range" src="https://docs.kamoji.bot/assets/images/colorways-4c116e5fa5a2ce6e0fc83759ecb1adb1.jpg" width="1600" height="1200" class="img_ev3q"></p>
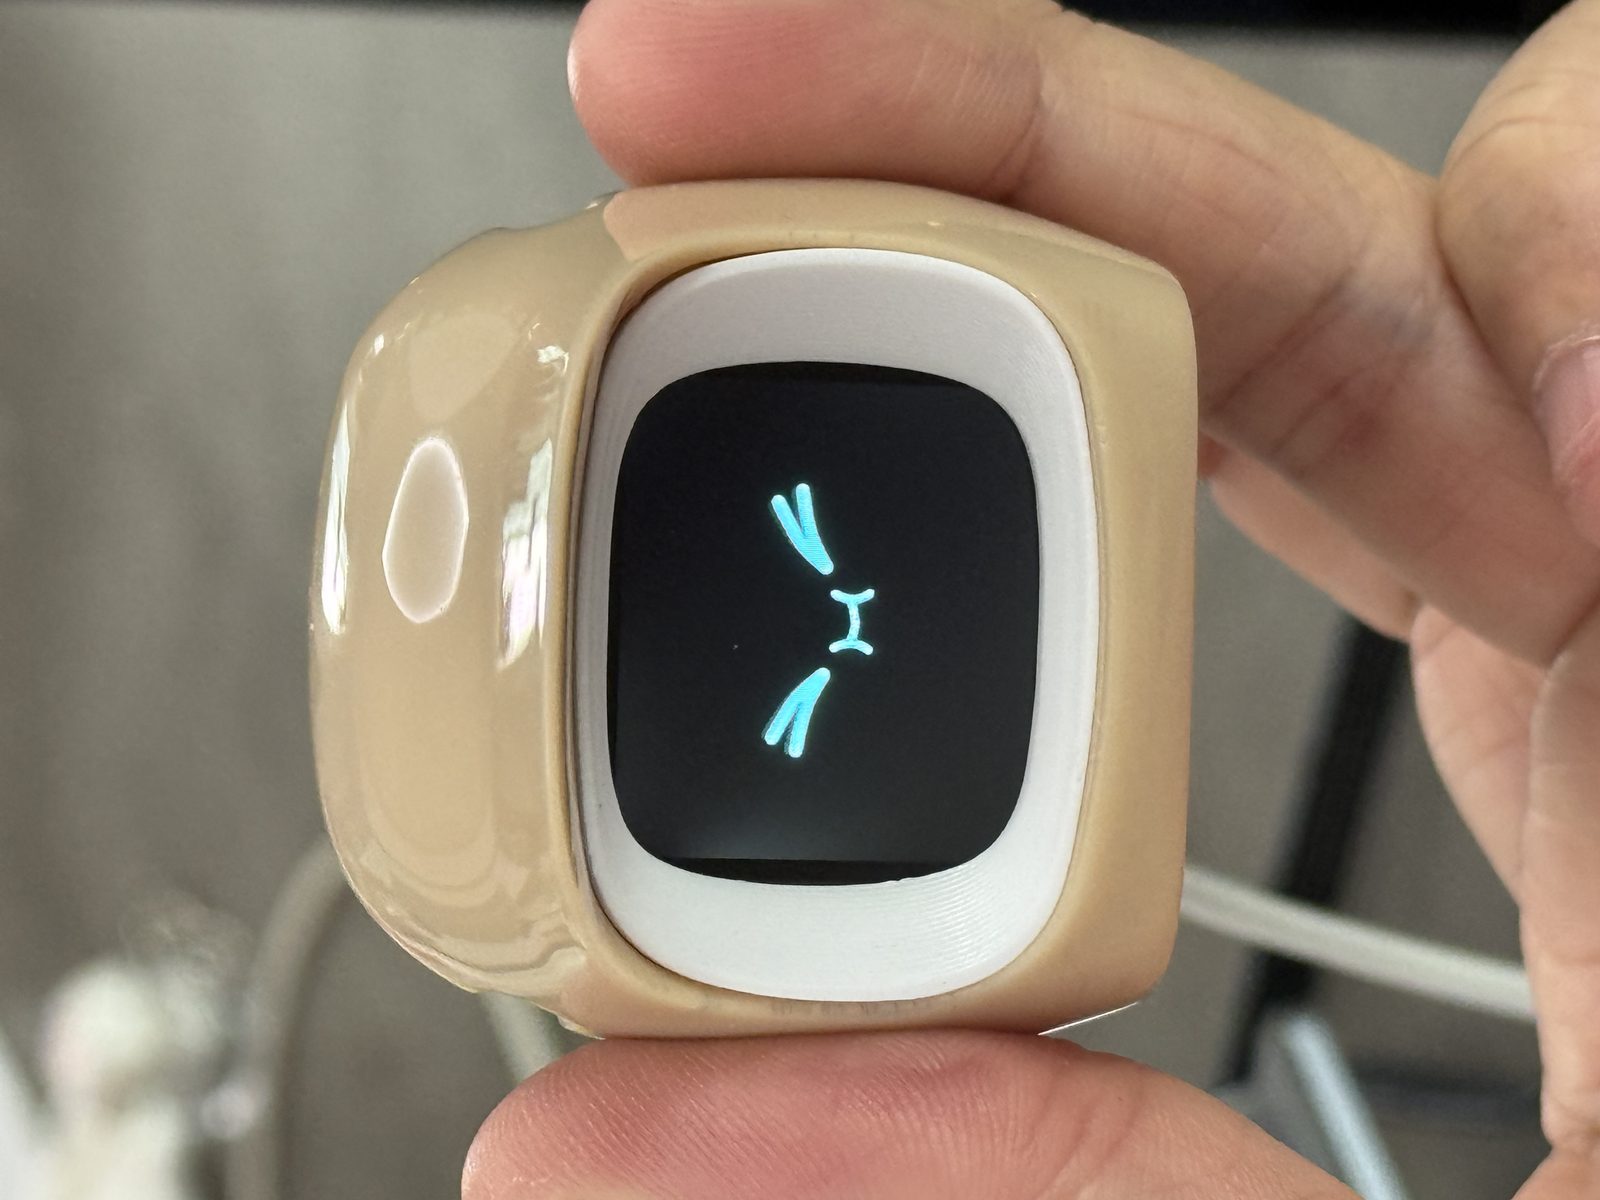
<p>The beige/cream body is the one that stuck: compact enough to sit in a palm,
with the display showing an animated face looking back at you.</p>
<p><img decoding="async" loading="lazy" alt="Finished beige Kamoji held in hand, display showing an expressive teal cat emoji face" src="https://docs.kamoji.bot/assets/images/beige-kamoji-in-hand-4ea3ff324cbcf7400fae6ba636b454bb.jpg" width="1600" height="1200" class="img_ev3q"></p>
<h2 class="anchor anchorTargetStickyNavbar_Vzrq" id="scouting-for-scale">Scouting for scale<a href="https://docs.kamoji.bot/blog/kamoji-manufacturing-and-launch#scouting-for-scale" class="hash-link" aria-label="Direct link to Scouting for scale" title="Direct link to Scouting for scale" translate="no">​</a></h2>
<p>With the design locked, we visited a manufacturing partner in Vietnam to
talk through what the next phase of production would need — not a vendor for
the first small batch, but a factory that could take Kamoji into the
thousands: sourcing, assembly, packaging, export documentation and
compliance certification, end to end.</p>
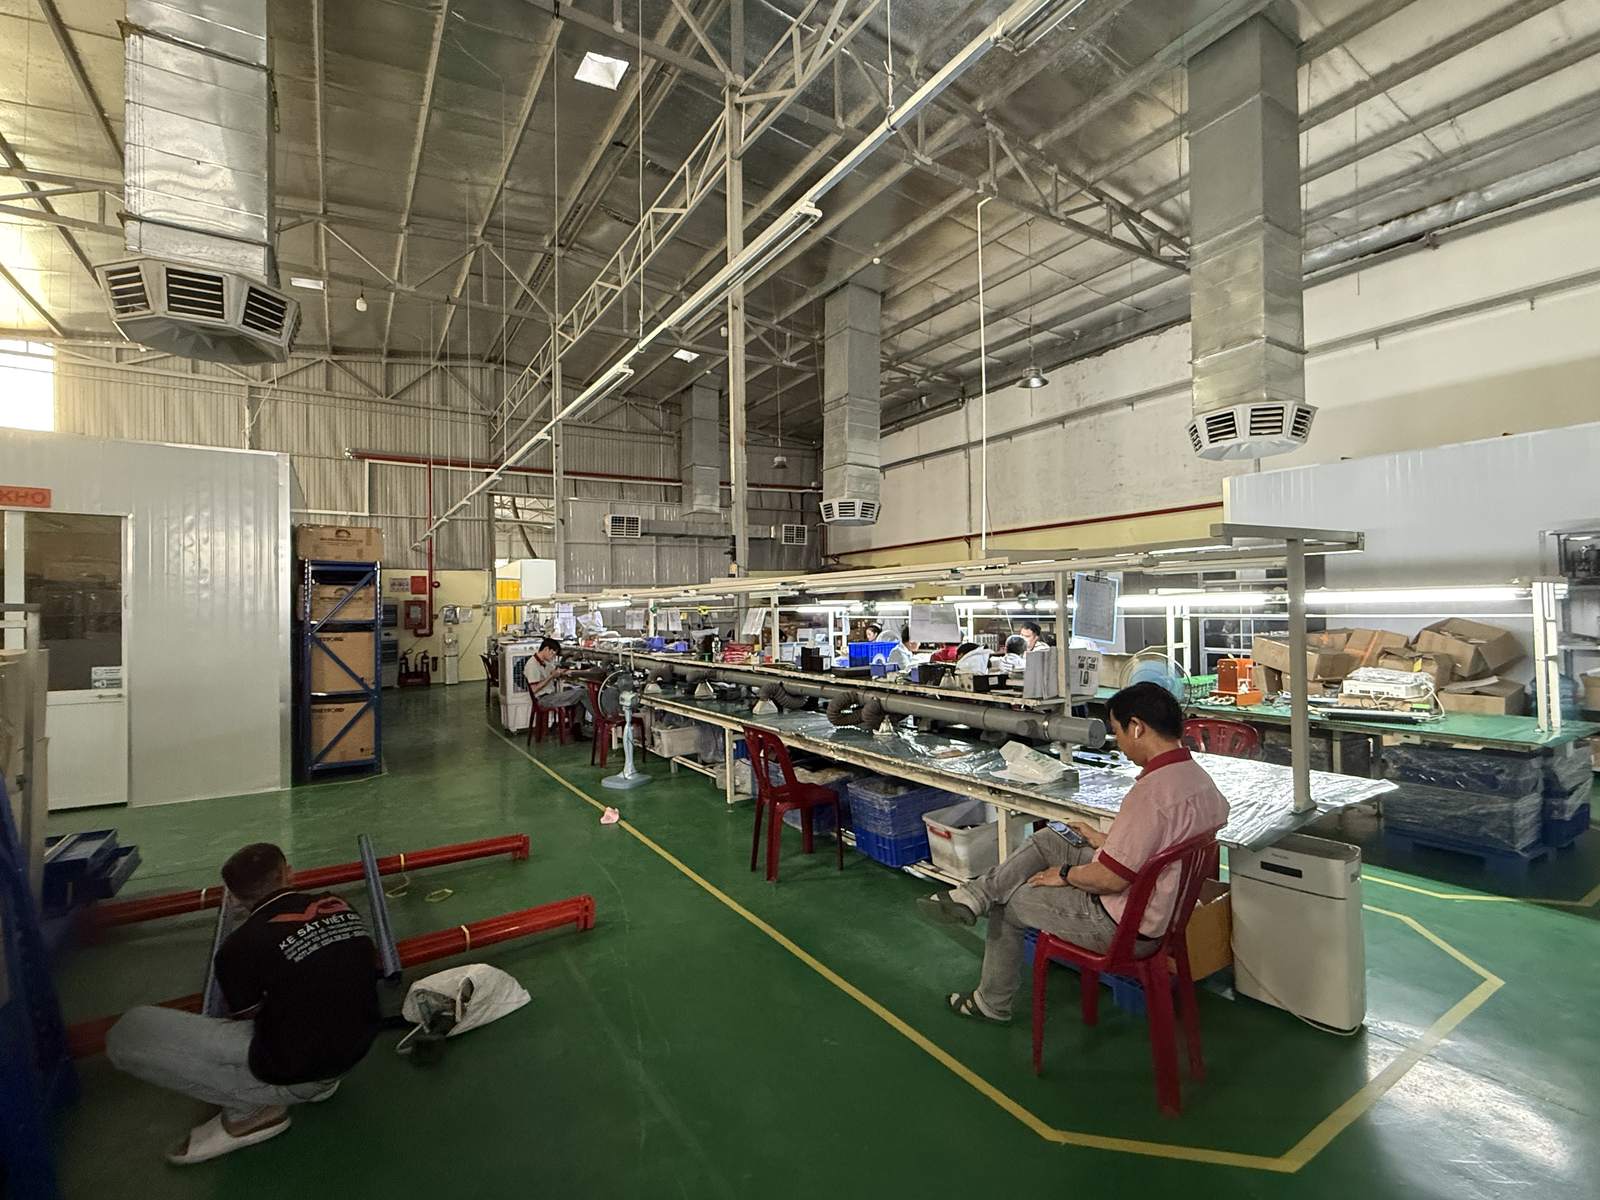
<p>The floor was in active use — assembly lines running, component shelving
along the length of the space.</p>
<p><img decoding="async" loading="lazy" alt="Active production floor with workers at assembly stations" src="https://docs.kamoji.bot/assets/images/factory-floor-f724bb2b966c414474f3de4f713ca97e.jpg" width="1600" height="1200" class="img_ev3q"></p>
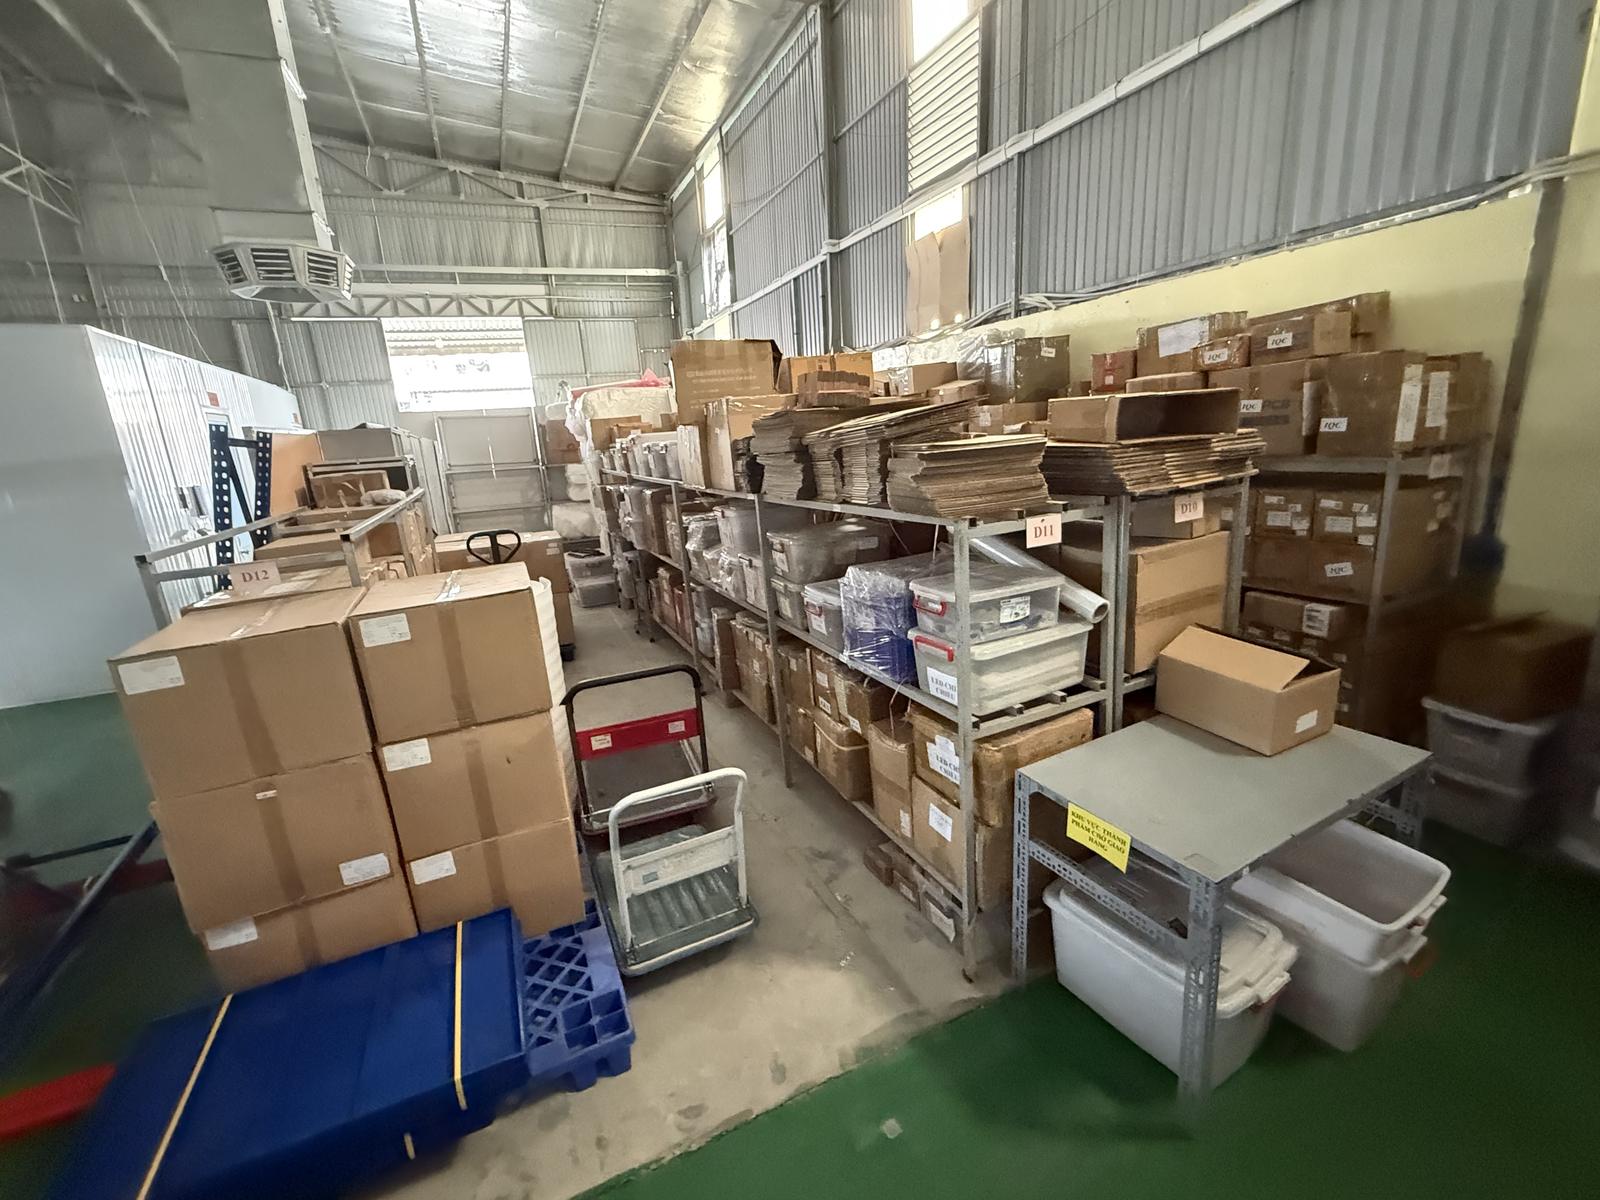
<p>The warehouse held floor-to-ceiling racking, organised stock and logistics
infrastructure already in place.</p>
<p><img decoding="async" loading="lazy" alt="Factory warehouse — floor-to-ceiling racking with labelled stock and logistics infrastructure" src="https://docs.kamoji.bot/assets/images/factory-warehouse-659fbd8dc5afcfa3c6877ef8e7193939.jpg" width="1600" height="1200" class="img_ev3q"></p>
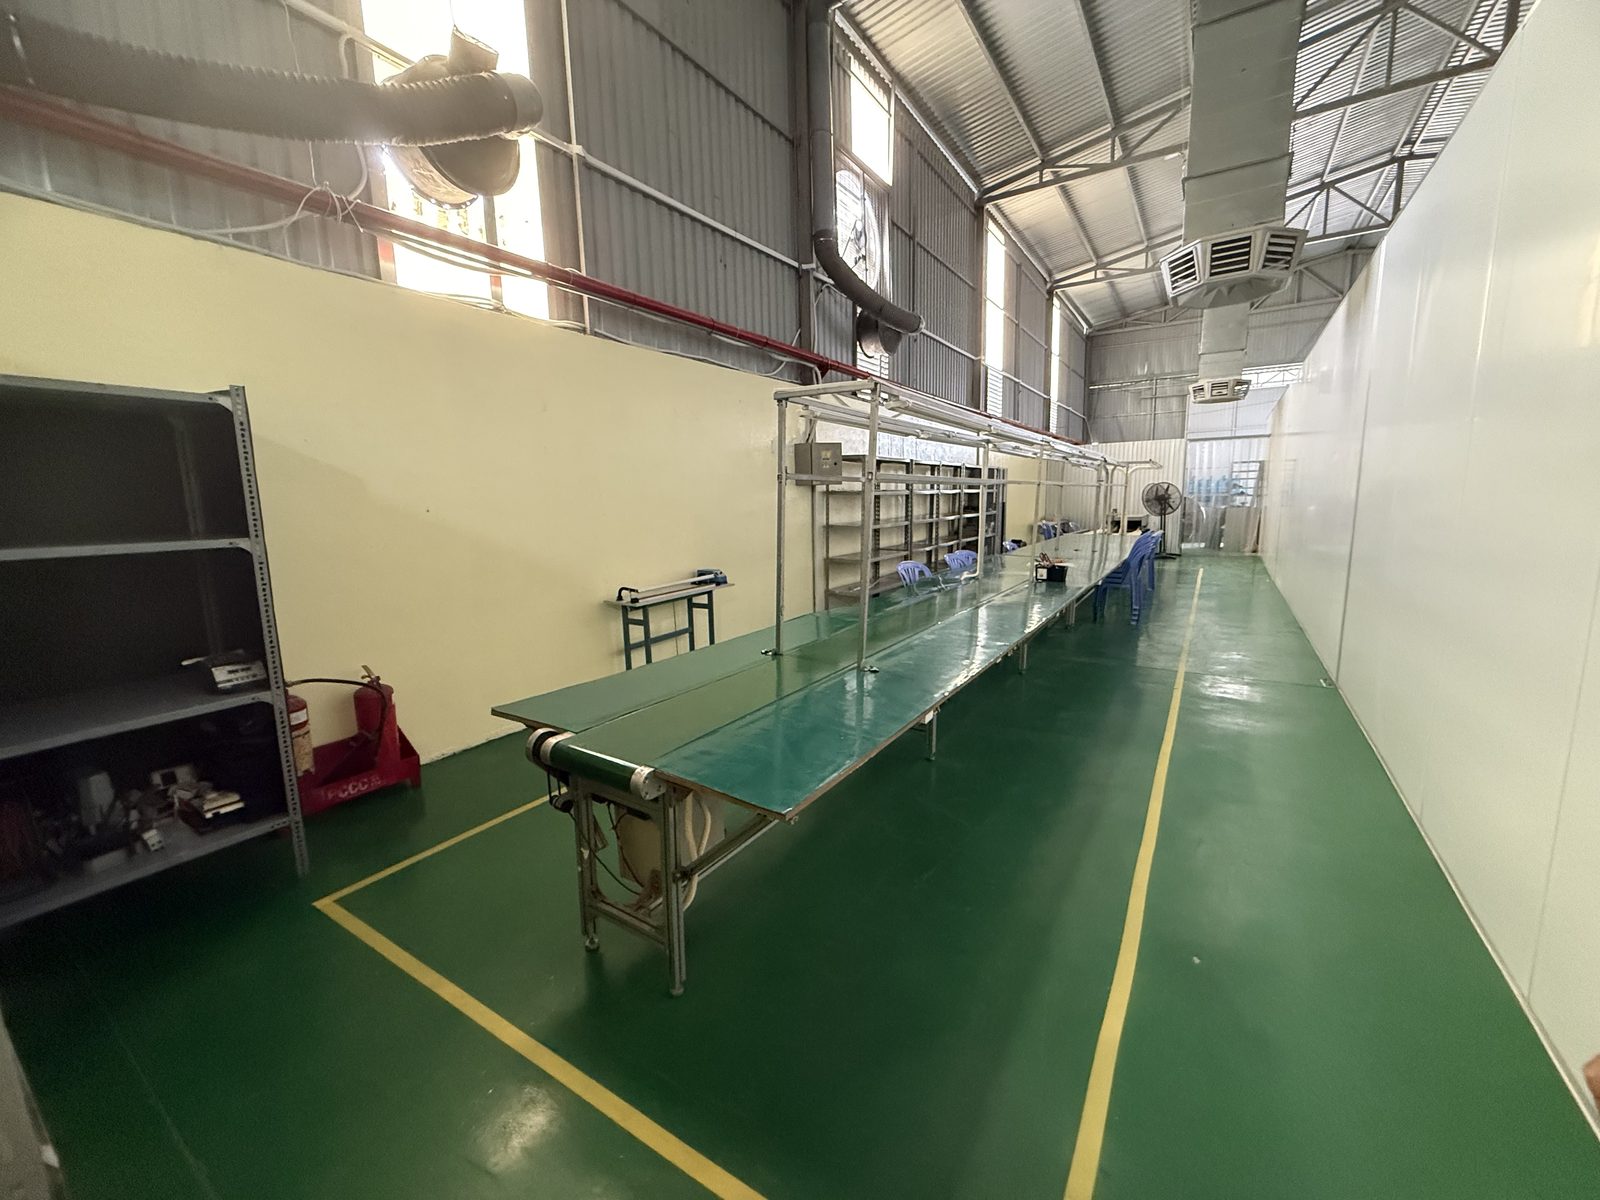
<p>A dedicated assembly line sat idle, ready to be brought online for a new
order —</p>
<p><img decoding="async" loading="lazy" alt="Empty assembly conveyor line with overhead component racks — available capacity ready for deployment" src="https://docs.kamoji.bot/assets/images/factory-assembly-line-28f9ad39a3ad5247260d3e35fd26f71d.jpg" width="1600" height="1200" class="img_ev3q"></p>
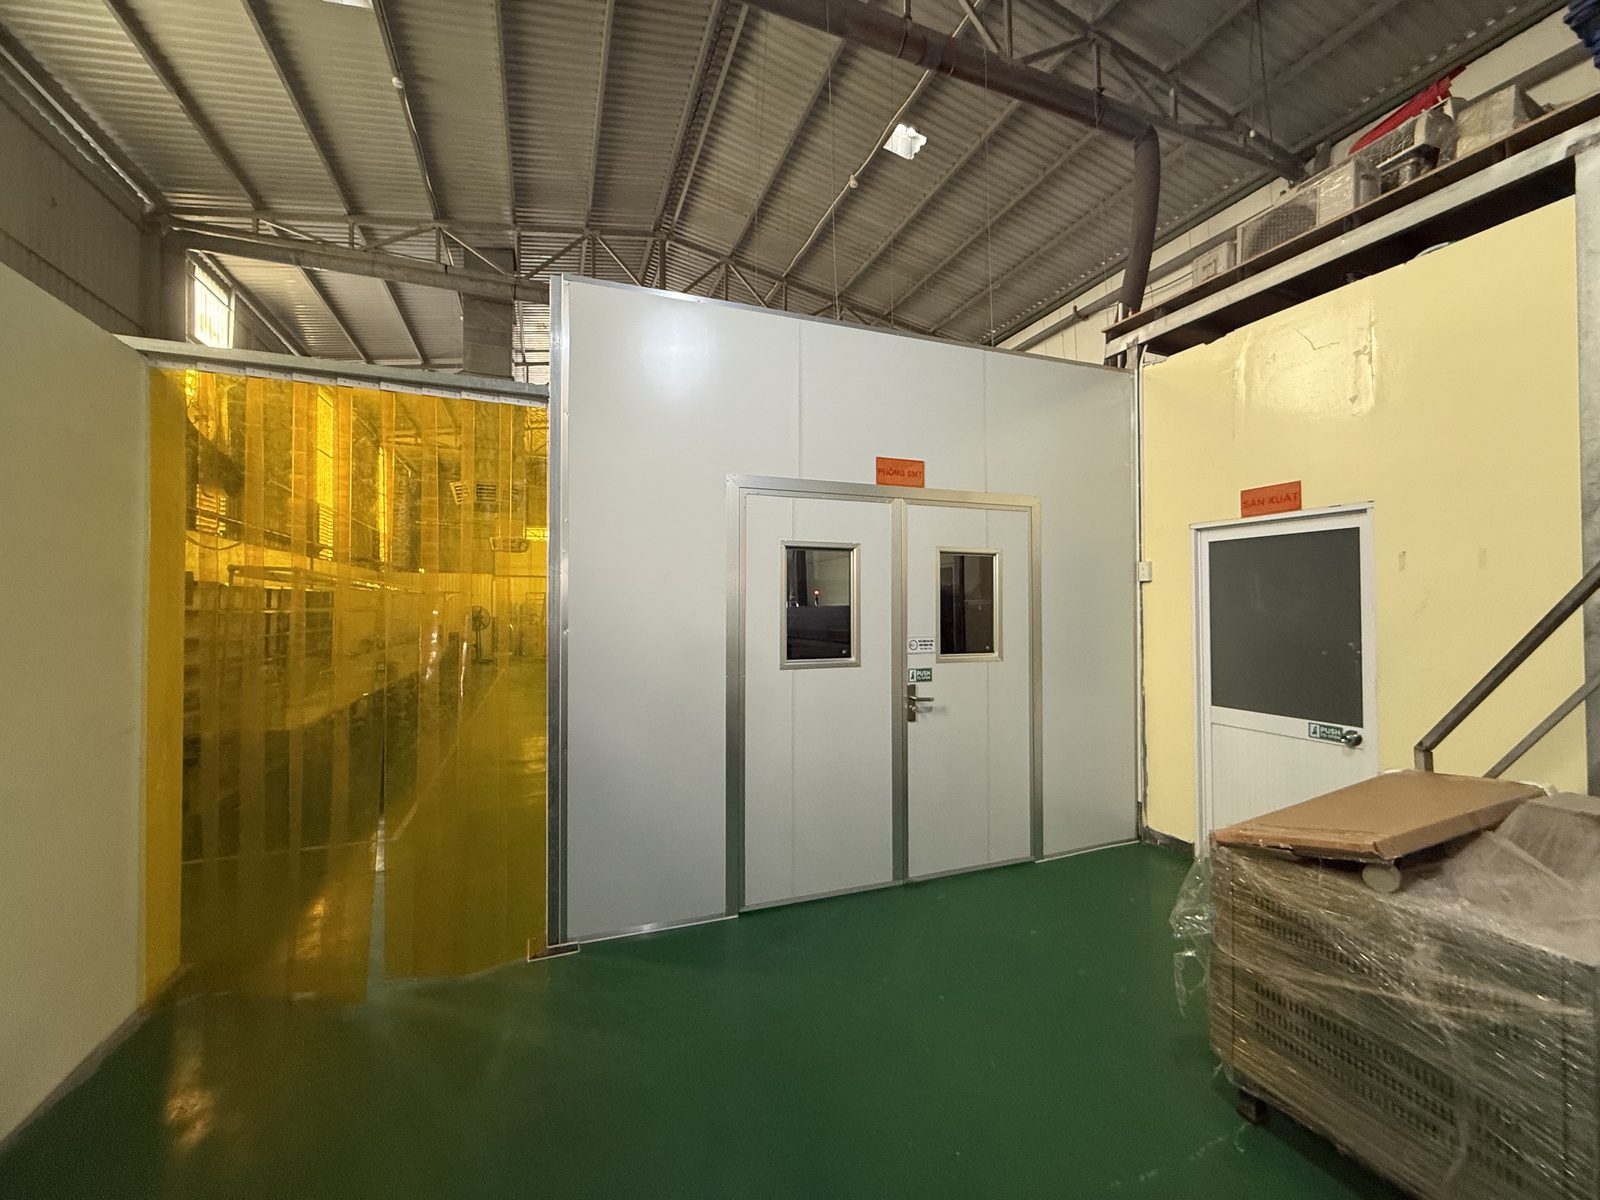
<p>— and, notably, an in-house SMT room behind clean-room doors, meaning PCB
assembly at scale without outsourcing the most technically demanding step to
a separate vendor.</p>
<p><img decoding="async" loading="lazy" alt="SMT room behind clean-room double doors — a dedicated surface-mount assembly facility" src="https://docs.kamoji.bot/assets/images/factory-smt-room-6d7f59c40cce1c84b0888bd7e191745b.jpg" width="1600" height="1200" class="img_ev3q"></p>
<h2 class="anchor anchorTargetStickyNavbar_Vzrq" id="what-200-real-units-taught-us-that-no-prototype-could">What 200 real units taught us that no prototype could<a href="https://docs.kamoji.bot/blog/kamoji-manufacturing-and-launch#what-200-real-units-taught-us-that-no-prototype-could" class="hash-link" aria-label="Direct link to What 200 real units taught us that no prototype could" title="Direct link to What 200 real units taught us that no prototype could" translate="no">​</a></h2>
<p>April 2026 also brought the first small manufactured batch: 200 units. Not
hand-assembled one-offs, not 3D-printed proofs of concept — real units
through real manufacturing, with the design fully committed.</p>
<p>We design everything in-house, but turning that design into a physical
product means coordinating vendors who each own a piece of the process: PCB
fabrication and assembly, structural 3D printing, the helmet shell,
packaging. Nearly every one of them produced a surprise.</p>
<p>The sharpest one: a fabrication issue during PCB manufacturing altered part
of the primary circuit path on the whole batch. We didn't have to scrap it,
because we'd already designed for exactly this possibility — Kamoji's PCB
deliberately includes duplicate and backup components on certain circuits,
the kind of redundancy that never makes it into a textbook-efficient board
layout but exists for moments like this one. When the primary path broke,
the backup held, and the batch shipped. It's the sort of design decision
that looks wasteful right up until it isn't.</p>
<p><img decoding="async" loading="lazy" alt="Bags of rubber display gaskets sorted and counted during the 200-unit manufacturing run" src="https://docs.kamoji.bot/assets/images/gasket-sorting-9a3c6dd73fa01ff66f55e15d40240245.jpg" width="1600" height="1200" class="img_ev3q"></p>
<p>With 200 boards to validate, manual testing wasn't realistic, so we built a
test rig: a fixture that loads firmware onto each board and runs a
semi-automated sequence checking that every sensor works before the unit
clears for assembly. A unit that ships with a dead IMU or microphone isn't
just a faulty product — Kamoji's whole personality depends on what its
sensors tell it.</p>
<h2 class="anchor anchorTargetStickyNavbar_Vzrq" id="education-before-conversion">Education before conversion<a href="https://docs.kamoji.bot/blog/kamoji-manufacturing-and-launch#education-before-conversion" class="hash-link" aria-label="Direct link to Education before conversion" title="Direct link to Education before conversion" translate="no">​</a></h2>
<p>With manufactured units in hand, we stood up a dedicated marketing effort to
introduce Kamoji properly. In-car accessories and dashboard companions exist
in quantity already, but a character-driven, sensor-integrated, open-source
companion that actually understands what the car is doing is not a category
most people have encountered yet. That makes the first challenge education,
not conversion — showing people what it does and how it feels to have one,
before asking them to want it.</p>
<h2 class="anchor anchorTargetStickyNavbar_Vzrq" id="what-this-project-actually-is">What this project actually is<a href="https://docs.kamoji.bot/blog/kamoji-manufacturing-and-launch#what-this-project-actually-is" class="hash-link" aria-label="Direct link to What this project actually is" title="Direct link to What this project actually is" translate="no">​</a></h2>
<p>Kamoji is the product of accumulated experience: a decade of Originally US
running its own IoT infrastructure in production, and a CTO whose background
spans mechanical design, electronics, firmware, software, animation and
video production, with a hand in every part of this device.</p>
<p>The team operates on one non-negotiable principle: no deadline, no
compromises. Kamoji took as long as it took — a 19-month pause included —
because shipping something we weren't proud of wasn't an option. Going fully
open-source from day one reinforces that by removing anywhere to hide: every
line of code, every schematic, every component choice is visible to anyone
who knows what they're looking at. That's uncomfortable in a useful way. No
shortcuts, no "fix it later" — every custom component and every redundant
circuit has to be something we're willing to defend in public.</p>
<p>The device isn't finished. It's real, it runs, it has a face, and people can
buy it.</p>
<p><strong>Where things stand now:</strong> the R8 board finished full testing in late July
2026 and is moving into FCC certification.</p>
<p>This is the last post in our series on how Kamoji got built. If you missed
the earlier ones: <a class="" href="https://docs.kamoji.bot/blog/kamoji-origins">origins</a>,
<a class="" href="https://docs.kamoji.bot/blog/kamoji-pcb-open-source-hardware">the PCB and open hardware</a>,
<a class="" href="https://docs.kamoji.bot/blog/kamoji-esphome-rebuild">the ESPHome rebuild</a>, and
<a class="" href="https://docs.kamoji.bot/blog/kamoji-feature-philosophy">feature philosophy</a>.</p>]]></content>
        <author>
            <name>Kamoji Team</name>
            <uri>https://docs.kamoji.bot</uri>
        </author>
        <category label="Kamoji" term="Kamoji"/>
        <category label="Maker" term="Maker"/>
        <category label="Hardware" term="Hardware"/>
        <category label="Open Source" term="Open Source"/>
    </entry>
    <entry>
        <title type="html"><![CDATA[How Kamoji started, five screens on a bench]]></title>
        <id>https://docs.kamoji.bot/blog/kamoji-origins</id>
        <link href="https://docs.kamoji.bot/blog/kamoji-origins"/>
        <updated>2026-08-17T00:00:00.000Z</updated>
        <summary type="html"><![CDATA[Before a single line of firmware was written, we had a decade of building our]]></summary>
        <content type="html"><![CDATA[<p>Before a single line of firmware was written, we had a decade of building our
own smart home and smart office automation at Originally US behind us —
custom hardware, our own firmware, none of it off the shelf. Kamoji is where
that experience pointed next: an in-car companion that could feel the road
and react to it.</p>
<p>The first task wasn't building a prototype. It was picking a screen.</p>
<!-- -->
<h2 class="anchor anchorTargetStickyNavbar_Vzrq" id="the-screen-comes-first">The screen comes first<a href="https://docs.kamoji.bot/blog/kamoji-origins#the-screen-comes-first" class="hash-link" aria-label="Direct link to The screen comes first" title="Direct link to The screen comes first" translate="no">​</a></h2>
<p>The display is the single most important electrical component in Kamoji.
Every reaction the device has — its personality, its expressions — comes
through that screen. Get it wrong at the start and you're rebuilding from the
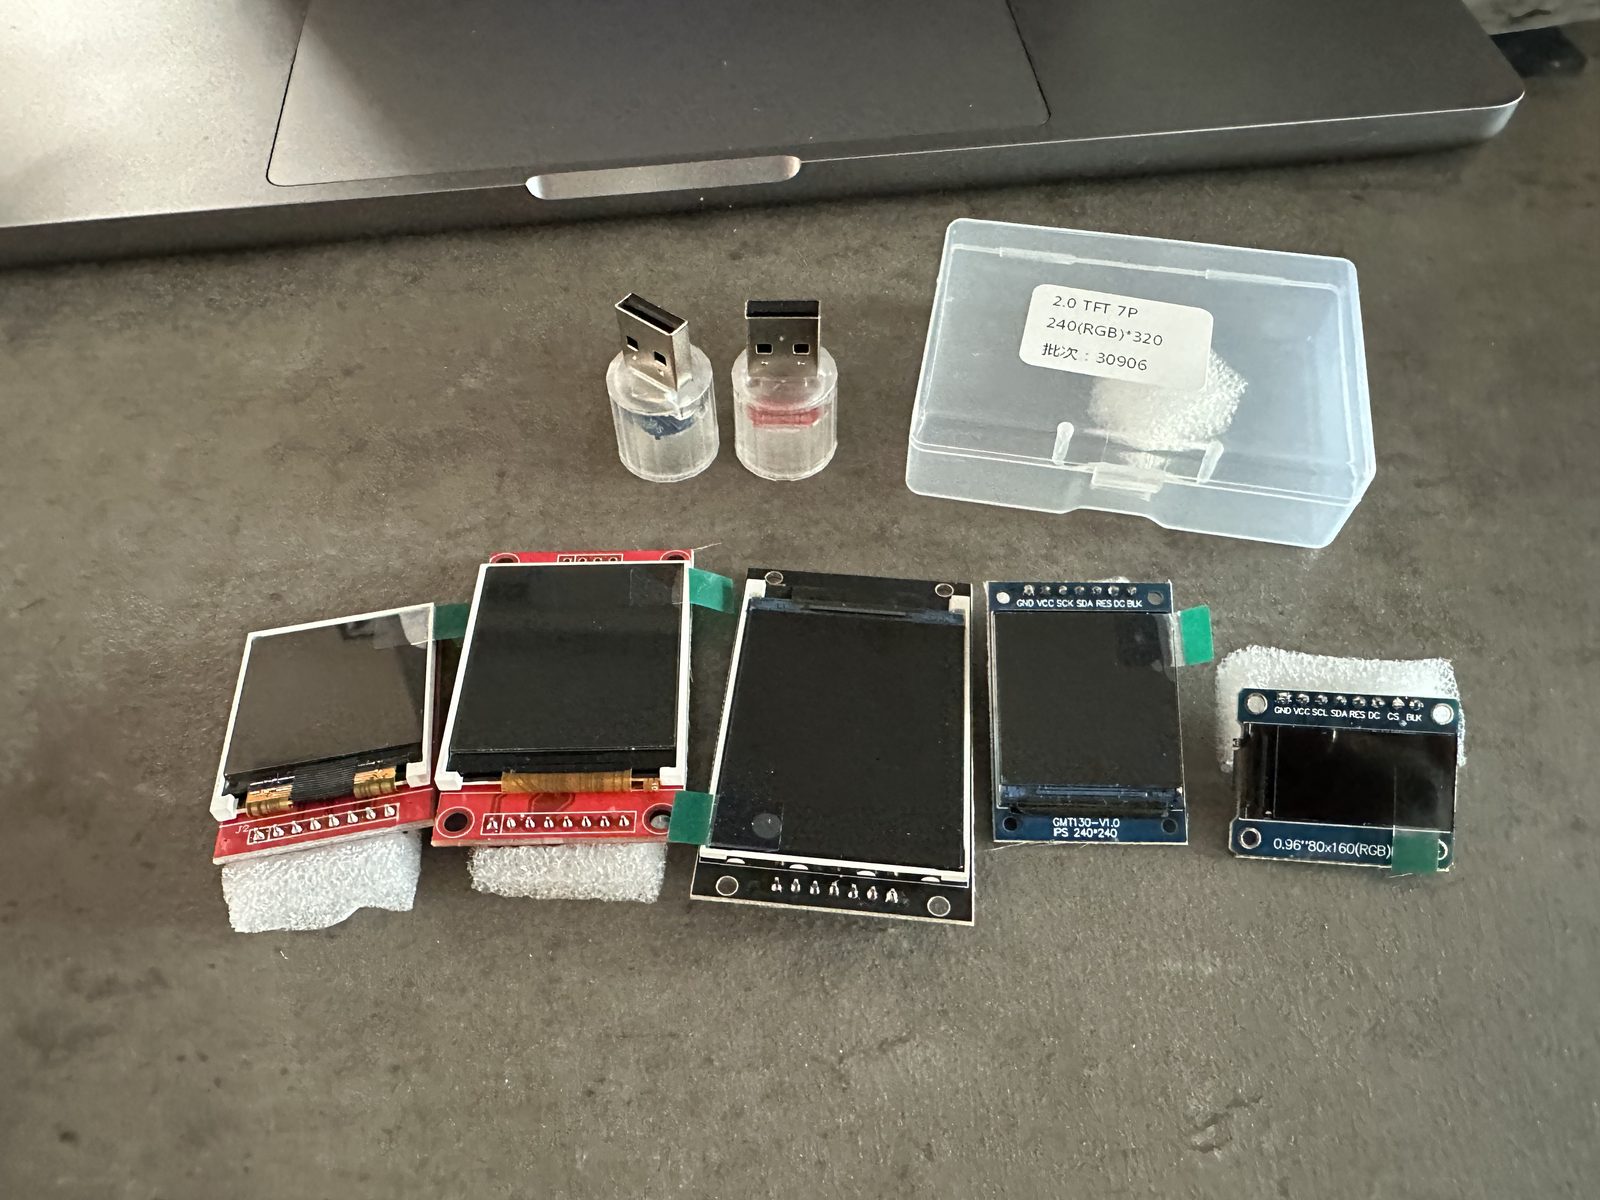
wrong foundation. So on September 26, 2023, before any firmware existed, we
ordered five LCD modules spanning different sizes, resolutions and screen
technologies.</p>
<p>They arrived two days later.</p>
<p><img decoding="async" loading="lazy" alt="Five display modules received on Sep 28, 2023 — ranging from 0.96&amp;quot; to 2.0&amp;quot;, each a different size and technology" src="https://docs.kamoji.bot/assets/images/screens-lineup-2058c59b110109212c5c19e4c8678c81.jpg" width="1600" height="1200" class="img_ev3q"></p>
<ul>
<li class="">0.96" 80×160 RGB IPS — the smallest</li>
<li class="">1.3" IPS 240×240 (GMT130-V1.0)</li>
<li class="">1.44" TFT SPI 128×128 (red PCB)</li>
<li class="">1.8" TFT SPI 128×160 (red PCB)</li>
<li class="">2.0" TFT SPI 240×320 (GMT020-02) — the largest</li>
</ul>
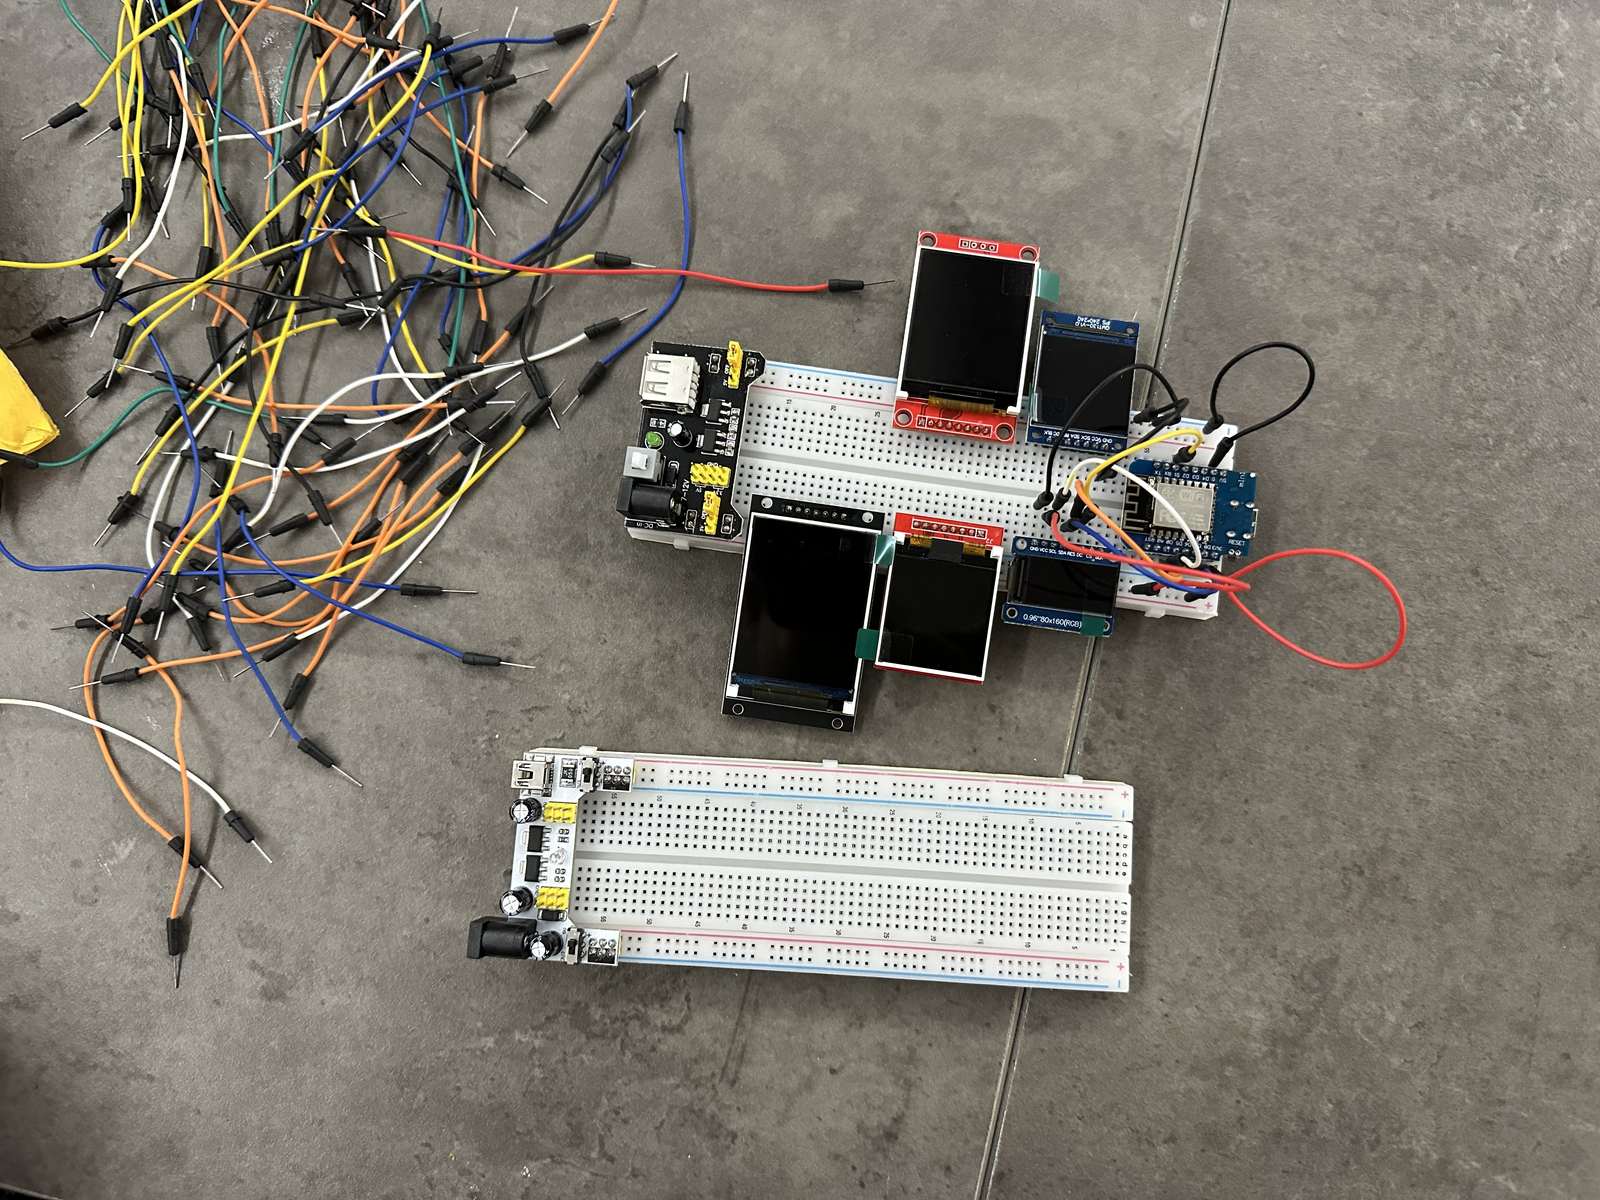
<p>One by one, each went on a breadboard, got firmware flashed, and was judged
on how it rendered.</p>
<p><img decoding="async" loading="lazy" alt="Multiple screens wired to breadboards simultaneously for side-by-side comparison testing" src="https://docs.kamoji.bot/assets/images/breadboard-comparison-e1e0db7c75859d9ab3b6d20ea5ec20a8.jpg" width="1600" height="1200" class="img_ev3q"></p>
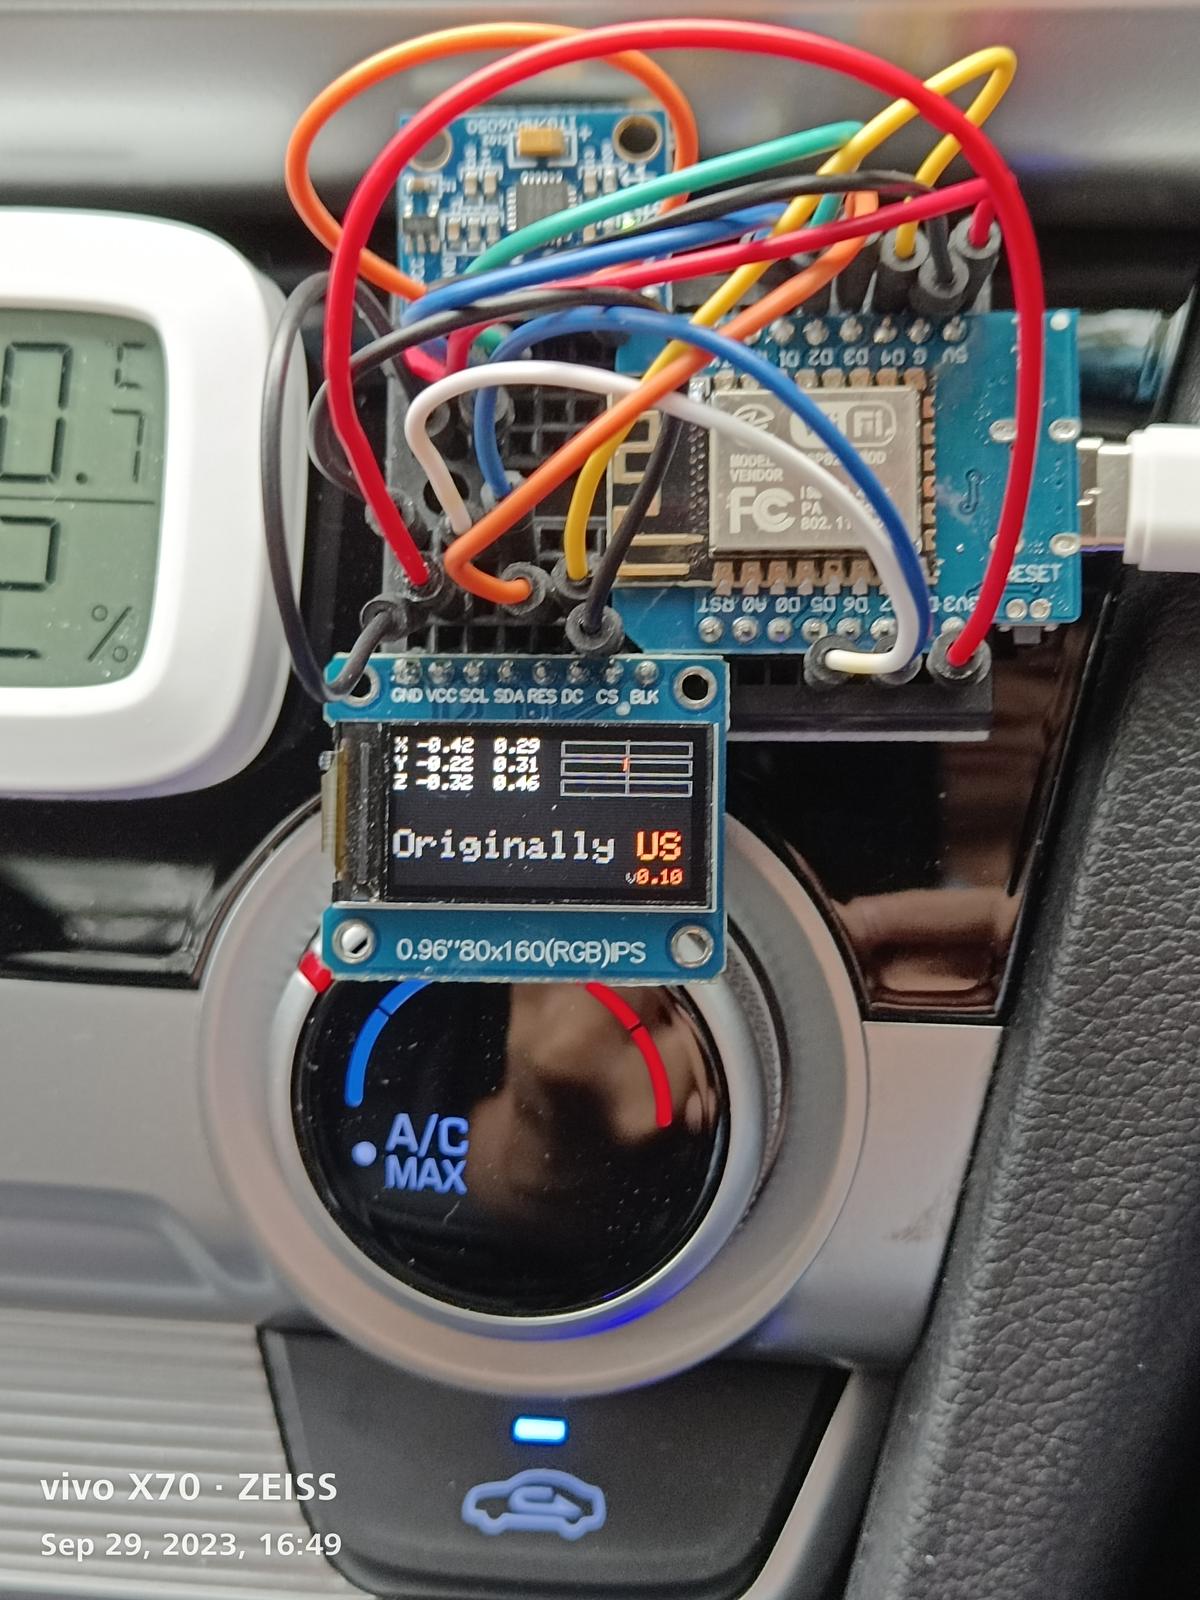
<p>The 1.3" IPS 240×240 (GMT130-V1.0) won — the highest pixel density and the
most vibrant color of the five. By 1:33 PM the next day — September 29 — the
prototype was already in a car. Not for a proper drive: the IMU was wired in,
reading pitch, roll and yaw, and the display sat on the seat showing the live
numbers as the rig was tilted by hand. The gyro was being tested in a real
car on day one of wiring anything up.</p>
<p><img decoding="async" loading="lazy" alt="Sep 29, 2023 — first in-car gyro test, breadboard prototype on the center console showing live IMU data" src="https://docs.kamoji.bot/assets/images/first-in-car-test-86e86404f65ad87e035b103f1b8e755e.jpg" width="1200" height="1600" class="img_ev3q"></p>
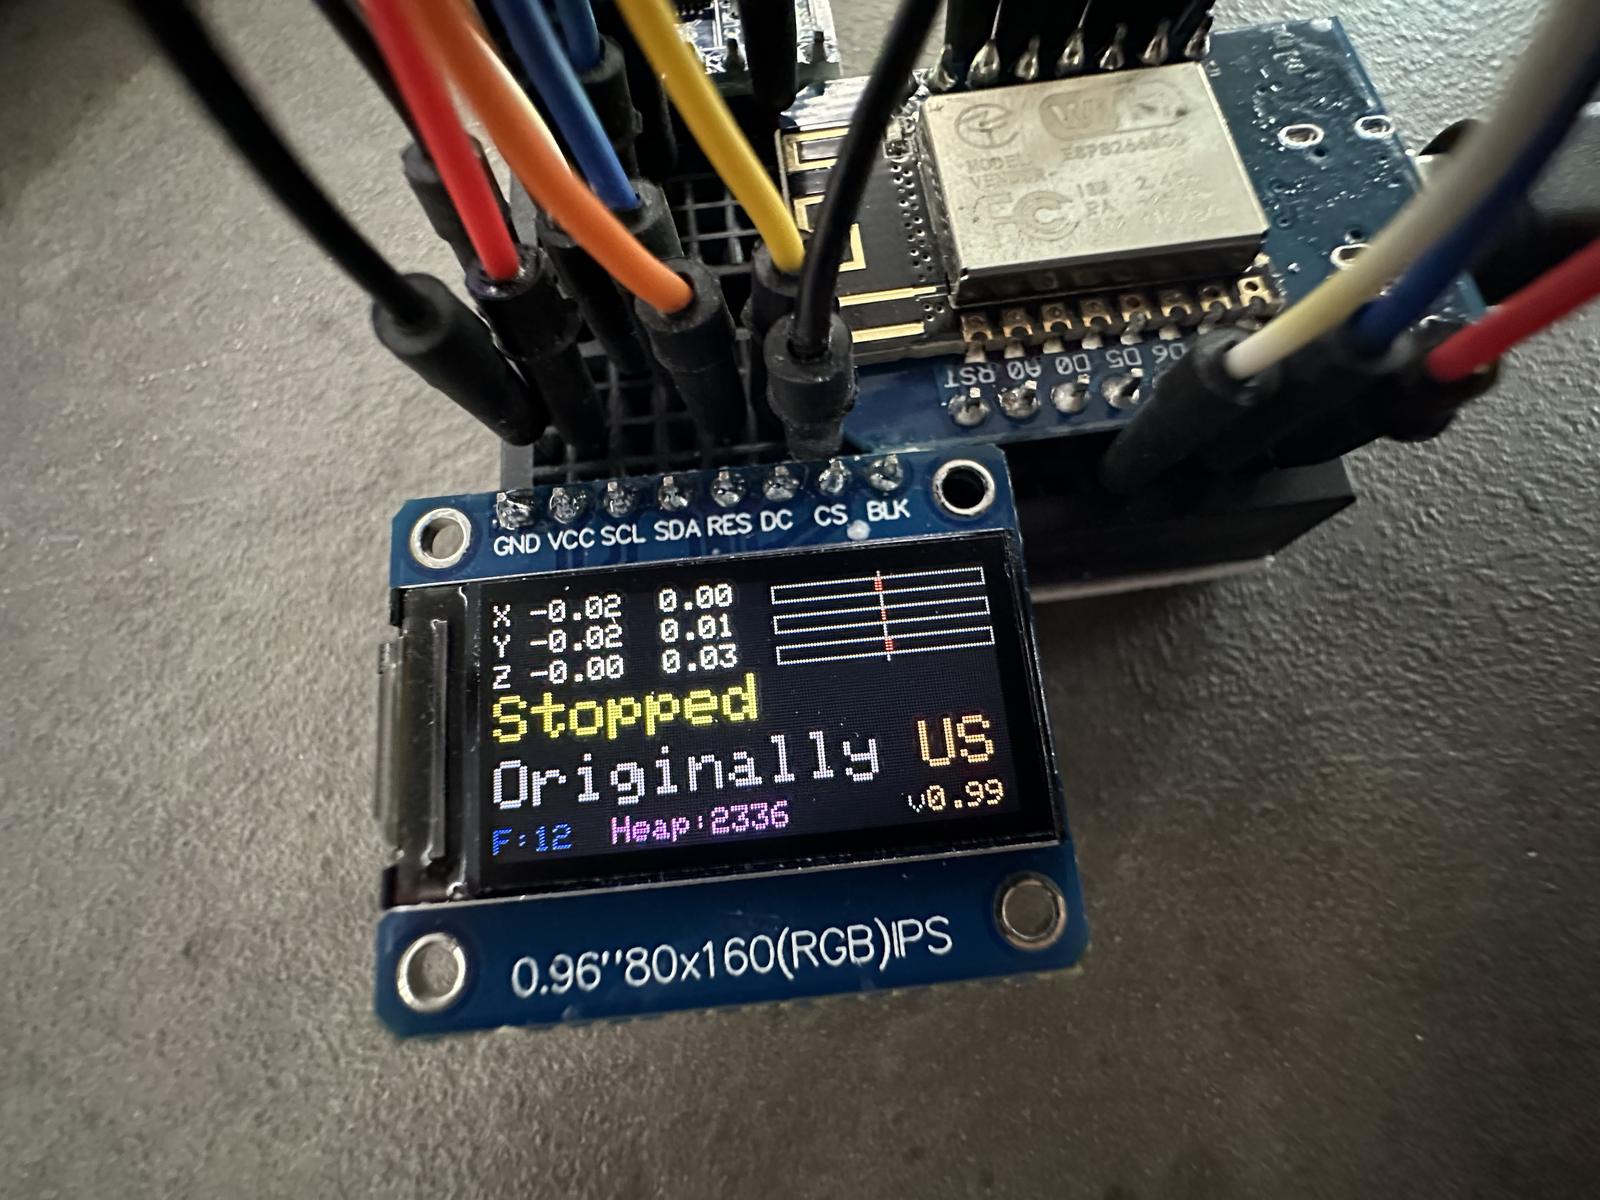
<p>The firmware said "Originally US v0.10". It wasn't Kamoji yet. But the
display was chosen, and it was already in a car.</p>
<h2 class="anchor anchorTargetStickyNavbar_Vzrq" id="from-sensor-readings-to-a-driving-state-machine">From sensor readings to a driving state machine<a href="https://docs.kamoji.bot/blog/kamoji-origins#from-sensor-readings-to-a-driving-state-machine" class="hash-link" aria-label="Direct link to From sensor readings to a driving state machine" title="Direct link to From sensor readings to a driving state machine" translate="no">​</a></h2>
<p>October 2 was a full day of firmware work — display iteration, IMU tuning —
now that the screen was settled. By October 5 the firmware had grown from
raw sensor numbers into a real driving state machine: "Cruising" when the car
moved, a braking state when it registered braking, "Stopped" when it stopped.
The whole rig — wires hanging off a breadboard, the display held up with
nothing, a power bank on a USB cable — was strapped to the center console
and taken out on an actual drive, early morning, near Ang Mo Kio.</p>
<p><img decoding="async" loading="lazy" alt="Display showing &amp;quot;Stopped / Originally US v0.99&amp;quot; — the driving state machine fully working" src="https://docs.kamoji.bot/assets/images/v099-display-8fbce8397caca4a5669e397ec585a0d5.jpg" width="1600" height="1200" class="img_ev3q"></p>
<p>By that evening, the firmware was at v0.99.</p>
<h2 class="anchor anchorTargetStickyNavbar_Vzrq" id="what-we-learned-from-taking-the-competition-apart">What we learned from taking the competition apart<a href="https://docs.kamoji.bot/blog/kamoji-origins#what-we-learned-from-taking-the-competition-apart" class="hash-link" aria-label="Direct link to What we learned from taking the competition apart" title="Direct link to What we learned from taking the competition apart" translate="no">​</a></h2>
<p>Before and during this early build phase, we did what we always do when
sizing up a product space: bought the competition and took it apart. Not
reviews, not product pages — we disassembled the closest competing in-car
companion devices and character accessories down to the component level,
identified the chips, read the PCB layouts, ran their firmware, and tested
how they actually responded to inputs.</p>
<p>Most of them contain no sensors at all — they're character displays, not
responsive devices. A few claim a motion sensor that barely registers a
violent shake. None had OTA firmware updates worth the name, and none showed
an architectural commitment to community contribution.</p>
<p>Kamoji samples its IMU 100 times a second and reacts to lean, brake and bump
in real time. We hadn't even made full use of that bandwidth yet, and the gap
to what was already on the market wasn't close.</p>
<h2 class="anchor anchorTargetStickyNavbar_Vzrq" id="the-chip-that-would-carry-the-rest-of-the-project">The chip that would carry the rest of the project<a href="https://docs.kamoji.bot/blog/kamoji-origins#the-chip-that-would-carry-the-rest-of-the-project" class="hash-link" aria-label="Direct link to The chip that would carry the rest of the project" title="Direct link to The chip that would carry the rest of the project" translate="no">​</a></h2>
<p>Two weeks in, on October 14, audio got added and tested — literally plugging
full-size headphones into the breadboard rig to check the output. Around the
same time we mounted an early rig on a 1/12-scale RC kei truck to test IMU
response on a moving platform without needing a real car every time.</p>
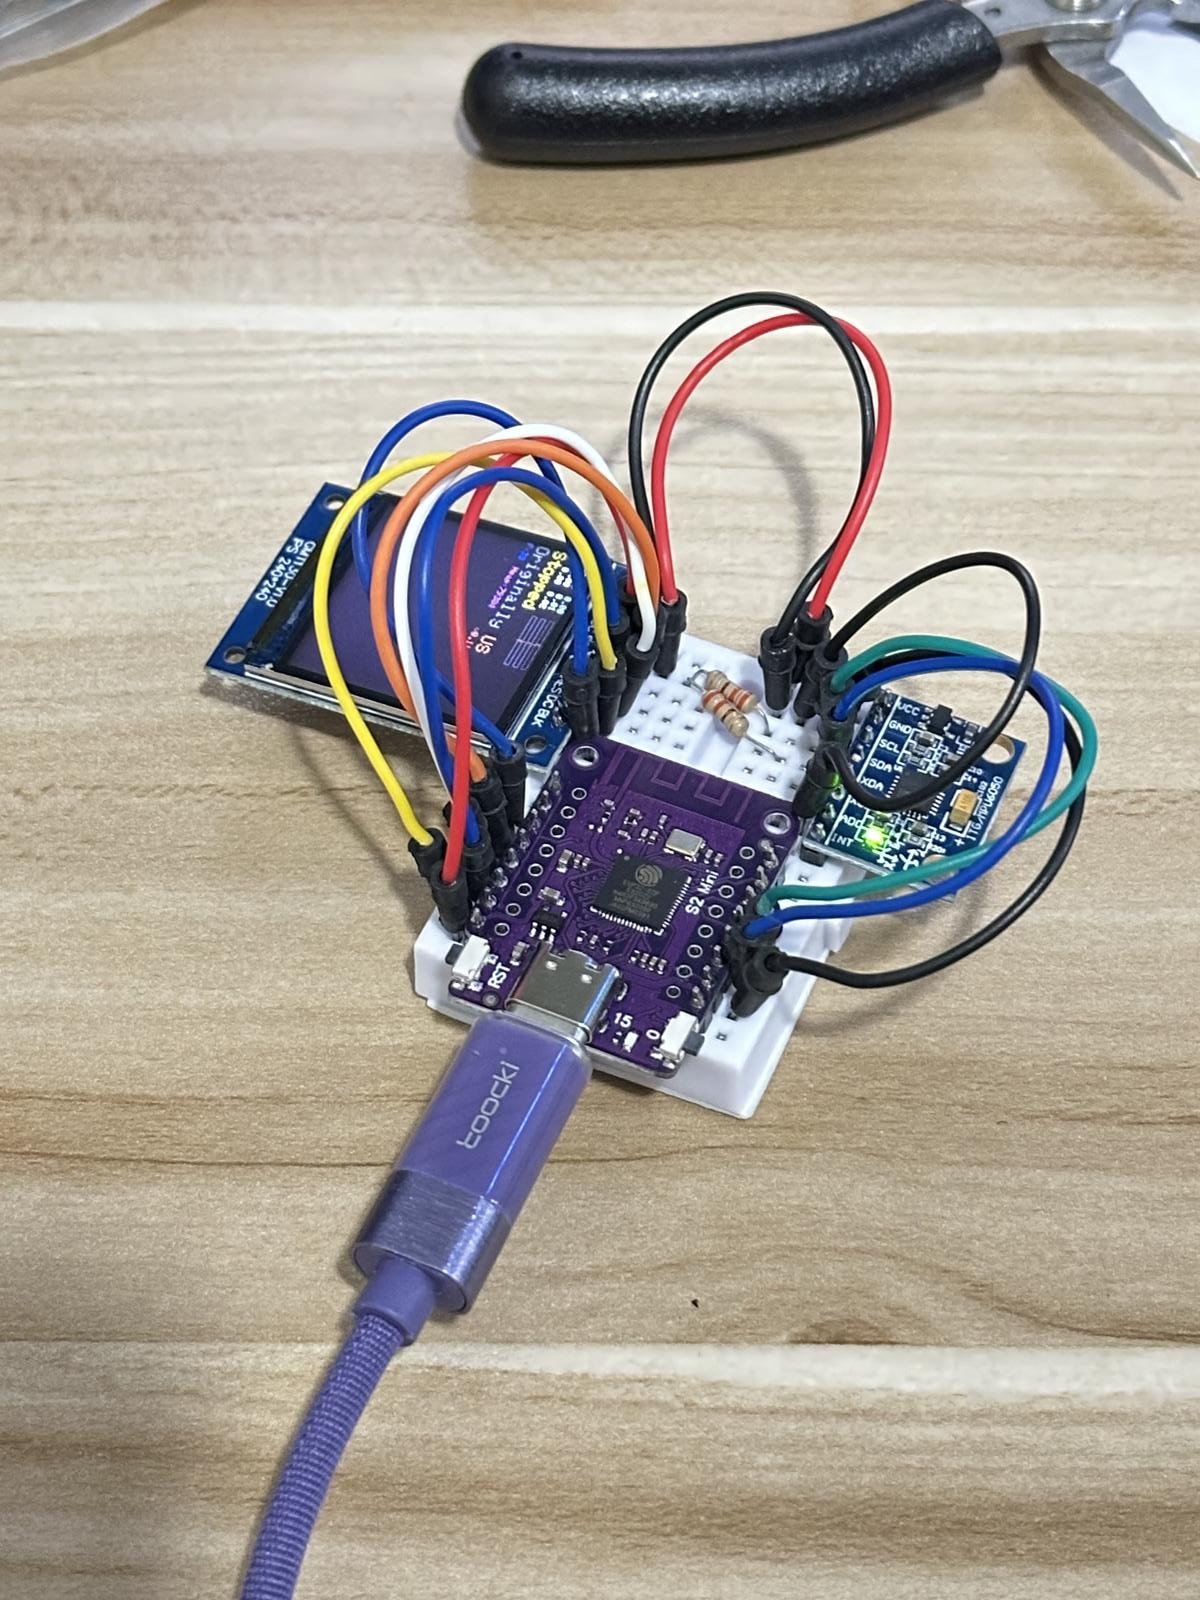
<p>That's also when we started looking at the <strong>ESP32-S3</strong> as a replacement for
the ESP8266 we'd started with — dual core, more memory, Bluetooth, native
USB. It's the chip Kamoji still runs on today.</p>
<p><img decoding="async" loading="lazy" alt="ESP32-S3 on breadboard — the upgraded microcontroller, with IMU sensor and display attached" src="https://docs.kamoji.bot/assets/images/esp32-s3-breadboard-f15a9bdc1bd516d46eb66a77479fff15.jpg" width="1200" height="1600" class="img_ev3q"></p>
<p>By this point the driving states — Cruising, Stopped, Hard brake — were each
triggering their own display output on our own firmware, on our own hardware.
Three weeks after five screens arrived on a bench, Kamoji had the beginning
of a personality.</p>
<p>This is the first post in a series on how Kamoji got built. Next: <a class="" href="https://docs.kamoji.bot/blog/kamoji-pcb-open-source-hardware">the ten
PCB revisions it took to get to a board we could ship, and why we designed
it to be open hardware</a>.</p>]]></content>
        <author>
            <name>Kamoji Team</name>
            <uri>https://docs.kamoji.bot</uri>
        </author>
        <category label="Kamoji" term="Kamoji"/>
        <category label="Hardware" term="Hardware"/>
        <category label="Maker" term="Maker"/>
    </entry>
    <entry>
        <title type="html"><![CDATA[Ten PCB revisions, and why Kamoji is open hardware]]></title>
        <id>https://docs.kamoji.bot/blog/kamoji-pcb-open-source-hardware</id>
        <link href="https://docs.kamoji.bot/blog/kamoji-pcb-open-source-hardware"/>
        <updated>2026-08-17T00:00:00.000Z</updated>
        <summary type="html"><![CDATA[By November 2023, the project had a name on the PCB silkscreen: "Kamoji]]></summary>
        <content type="html"><![CDATA[<p>By November 2023, the project had a name on the PCB silkscreen: "Kamoji
prototype v1 p0", crafted by Originally US. What followed was ten PCB
revisions, one deliberately reversed decision, and a set of component
choices aimed less at us and more at whoever wants to build on this board
after we're done with it.</p>
<!-- -->
<h2 class="anchor anchorTargetStickyNavbar_Vzrq" id="no-battery-on-purpose">No battery, on purpose<a href="https://docs.kamoji.bot/blog/kamoji-pcb-open-source-hardware#no-battery-on-purpose" class="hash-link" aria-label="Direct link to No battery, on purpose" title="Direct link to No battery, on purpose" translate="no">​</a></h2>
<p>One decision got made early and never revisited: <strong>Kamoji has no internal
battery.</strong> That's not a cost cut, it's a safety call. Kamoji lives on a car
dashboard, and a dashboard in direct sunlight gets hot enough that putting a
lithium cell there is a bad idea. Kamoji draws power from the car instead,
over USB. Clean, safe, and one less thing that can fail over years of daily
use in a hot car.</p>
<h2 class="anchor anchorTargetStickyNavbar_Vzrq" id="a-display-that-stopped-breaking-during-assembly">A display that stopped breaking during assembly<a href="https://docs.kamoji.bot/blog/kamoji-pcb-open-source-hardware#a-display-that-stopped-breaking-during-assembly" class="hash-link" aria-label="Direct link to A display that stopped breaking during assembly" title="Direct link to A display that stopped breaking during assembly" translate="no">​</a></h2>
<p>Up to Revision 7, the display's flex connector was soldered directly to the
board — no connector, just a permanent joint. That was fine on a bench. It
was not fine once full assembly started: the tight fit inside the helmet
was cracking screens during assembly, and a broken screen soldered straight
to the board meant desoldering the flex cable and soldering in a new
display by hand, every time. Slow, and easy to damage something else in the
process.</p>
<p>R8 replaced that joint with a removable FPC connector, so a cracked screen
during assembly (or later, in the field) is a matter of unclipping one and
clipping in another — no iron required.</p>
<h2 class="anchor anchorTargetStickyNavbar_Vzrq" id="staying-awake-just-long-enough-to-say-goodbye">Staying awake just long enough to say goodbye<a href="https://docs.kamoji.bot/blog/kamoji-pcb-open-source-hardware#staying-awake-just-long-enough-to-say-goodbye" class="hash-link" aria-label="Direct link to Staying awake just long enough to say goodbye" title="Direct link to Staying awake just long enough to say goodbye" translate="no">​</a></h2>
<p>Having no battery raises an obvious question: what happens the instant you
unplug it? On the R8 board, the answer is a supercapacitor — not a battery,
and not meant to run the device independently, but enough charge to keep
Kamoji powered for a few seconds after USB power is cut. That's enough time
to save trip statistics and play a short goodbye animation before shutting
down cleanly, instead of just going dark mid-frame.</p>
<p>R8 also added a pogo-pin connector on the underside of the board — magnetic,
in the same spirit as Apple's MagSafe, so an accessory snaps into alignment
rather than needing to be plugged in precisely. It's unpopulated today.
It's there for future expansion — additional sensors, or an external
battery pack for people who want to run Kamoji off the dashboard entirely,
say sitting on a desk. Nothing ships on that connector yet. It's board real
estate reserved for later, on purpose.</p>
<h2 class="anchor anchorTargetStickyNavbar_Vzrq" id="two-boards-one-board-two-boards-again">Two boards, one board, two boards again<a href="https://docs.kamoji.bot/blog/kamoji-pcb-open-source-hardware#two-boards-one-board-two-boards-again" class="hash-link" aria-label="Direct link to Two boards, one board, two boards again" title="Direct link to Two boards, one board, two boards again" translate="no">​</a></h2>
<p>The production board is labelled R7.2, which undersells it — the actual
count is at least ten distinct iterations. Version numbers don't increment
neatly when you're learning fast and reversing decisions.</p>
<p><strong>Revision 1</strong> split the electronics across two PCBs in an L-shape. That
wasn't arbitrary: at that stage there was still real uncertainty about which
sensors would survive contact with reality, so committing to a single
compact board would have meant locking in answers we didn't have yet. Two
boards also left room for the debug headers and test points that early-stage
hardware needs — real estate you don't want competing for space on the board
you eventually ship.</p>
<p><strong>Revision 2</strong> combined the two boards into one flat PCB, on the logical
assumption that simpler is better. It introduced two problems we hadn't
anticipated. The USB-C port stood vertically proud of the board surface —
mechanically fragile, a bad fit for a device that gets handled often. Worse
for the product direction: a flat board is geometrically hostile to a
rounded enclosure. There's no elegant way to wrap smooth, curved surfaces
around a rectangular slab.</p>
<p><strong>Later revisions</strong> went back to two boards, but better than Revision 1: the
USB-C connector redesigned into a recessed, more robust mount, and the
L-shape replaced by a stacked arrangement that worked with the helmet
geometry instead of fighting it. The two-board split also opened a future the
single board had closed off — the lower board can be revised independently,
so future hardware can add sensors or connectivity without a full redesign of
the main board.</p>
<p>The lesson: don't simplify for simplicity's sake. Simplify when the
trade-offs are actually better, not just when there are fewer parts.</p>
<h2 class="anchor anchorTargetStickyNavbar_Vzrq" id="building-a-board-other-people-can-actually-work-on">Building a board other people can actually work on<a href="https://docs.kamoji.bot/blog/kamoji-pcb-open-source-hardware#building-a-board-other-people-can-actually-work-on" class="hash-link" aria-label="Direct link to Building a board other people can actually work on" title="Direct link to Building a board other people can actually work on" translate="no">​</a></h2>
<p>From day one, the plan was to fully open-source Kamoji once it shipped.
That's a product philosophy, not an afterthought — Originally US has a long
history with open source, and we wanted the firmware platform to let people
hit the ground running. That's the reasoning behind starting on Arduino: the
most established maker platform, with the largest community and the least
friction to get started.</p>
<p>The same philosophy runs down to the components on the board. The rule was:
good enough for production, small enough to keep the board compact, but
never so small that the maker community can't source or hand-solder a
replacement. The smallest component on the board is <strong>0805</strong> — we
deliberately stayed off 0603 or 0402, sizes most makers aren't comfortable
soldering by hand. Most of what's on the board is popular, well-documented,
and easy to buy.</p>
<p>We also left deliberate room for advanced makers to wire in their own
sensors and attachments beyond what Kamoji's own firmware uses. That's an
intentional invitation, and it's the reason we're planning a tutorial and
video series under the name <strong>"Made with Kamoji"</strong> — projects that use the
Kamoji board as a development platform for things that have nothing to do
with Kamoji itself.</p>
<p>This is the second post in a series on how Kamoji got built. Next: <a class="" href="https://docs.kamoji.bot/blog/kamoji-esphome-rebuild">the
19-month pause, and rebuilding the firmware from scratch on
ESPHome</a>.</p>]]></content>
        <author>
            <name>Kamoji Team</name>
            <uri>https://docs.kamoji.bot</uri>
        </author>
        <category label="Kamoji" term="Kamoji"/>
        <category label="Hardware" term="Hardware"/>
        <category label="Open Source" term="Open Source"/>
        <category label="Maker" term="Maker"/>
    </entry>
    <entry>
        <title type="html"><![CDATA[The Cup of Water Test, and the Physics Behind It]]></title>
        <id>https://docs.kamoji.bot/blog/cup-of-water-test</id>
        <link href="https://docs.kamoji.bot/blog/cup-of-water-test"/>
        <updated>2026-08-14T00:00:00.000Z</updated>
        <summary type="html"><![CDATA[There is a well-known way to find out how smoothly someone drives, and it]]></summary>
        <content type="html"><![CDATA[<p>There is a well-known way to find out how smoothly someone drives, and it
costs about as much as a cup of water.</p>
<p>Put a full, open cup somewhere in the car. Drive. If you arrive with the cup
still full, you drove smoothly. If you arrive wearing it, you didn't.</p>
<p>It sounds like a party trick. It's actually a fairly precise instrument, and
it's the idea behind Takumi's Cup Challenge in Kamoji.</p>
<!-- -->
<h2 class="anchor anchorTargetStickyNavbar_Vzrq" id="where-it-comes-from">Where it comes from<a href="https://docs.kamoji.bot/blog/cup-of-water-test#where-it-comes-from" class="hash-link" aria-label="Direct link to Where it comes from" title="Direct link to Where it comes from" translate="no">​</a></h2>
<p>The test is best known from <em>Initial D</em>, the street-racing manga and anime.</p>
<p>Takumi Fujiwara spends his mornings delivering tofu up Mt. Akina in his
father's Toyota Sprinter Trueno — the AE86 — starting at four in the morning.
His father Bunta puts a cup of water in the car and tells him not to spill
it. Tofu is delicate cargo, and the water stands in for it.</p>
<p>Takumi does this every morning for five years, in every kind of weather,
believing he is just delivering tofu. He is in fact being taught weight
transfer, braking control and how to carry momentum through a corner, by a
father who never explains what the cup is for.</p>
<p>It's a good story. It's also good engineering, because the cup is measuring
something real.</p>
<h2 class="anchor anchorTargetStickyNavbar_Vzrq" id="what-the-cup-actually-measures">What the cup actually measures<a href="https://docs.kamoji.bot/blog/cup-of-water-test#what-the-cup-actually-measures" class="hash-link" aria-label="Direct link to What the cup actually measures" title="Direct link to What the cup actually measures" translate="no">​</a></h2>
<p>A liquid surface always settles perpendicular to the total force acting on
it. Standing still, that force is gravity, and the surface is level. Under
cornering, braking or acceleration, the water tilts — and the angle is not
arbitrary:</p>
<div class="language-text codeBlockContainer_Ckt0 theme-code-block" style="--prism-color:#393A34;--prism-background-color:#f6f8fa"><div class="codeBlockContent_QJqH"><pre tabindex="0" class="prism-code language-text codeBlock_bY9V thin-scrollbar" style="color:#393A34;background-color:#f6f8fa"><code class="codeBlockLines_e6Vv"><div class="token-line" style="color:#393A34"><span class="token plain">tan(θ) = a / g</span><br></div></code></pre></div></div>
<p>Where <code>a</code> is the acceleration the car is pulling and <code>g</code> is gravity.</p>
<div class="row_FWvn"><figure class="cupFigure_LhDN"><svg viewBox="0 0 220 190" class="svg_HLog" role="img" aria-label="Stationary: water surface tilted 0.0 degrees at 0 g"><polygon points="50,130 170,130 170,70 50,70" class="water_tb93"></polygon><line x1="38" y1="70" x2="182" y2="70" class="reference_blIf"></line><line x1="38" y1="70" x2="182" y2="70" class="surface_YS7N"></line><path d="M 50 40 L 50 130 L 170 130 L 170 40" class="cup_kJtk"></path><line x1="42" y1="40" x2="50" y2="40" class="cup_kJtk"></line><line x1="170" y1="40" x2="178" y2="40" class="cup_kJtk"></line><text x="110" y="26" class="caption_Tm5j">Stationary</text><defs><marker id="cup-arrow" viewBox="0 0 10 10" refX="8" refY="5" markerWidth="5" markerHeight="5" orient="auto-start-reverse"><path d="M 0 0 L 10 5 L 0 10 z" class="arrowHead_oI1R"></path></marker></defs></svg></figure><figure class="cupFigure_LhDN"><svg viewBox="0 0 220 190" class="svg_HLog" role="img" aria-label="0.20 g: water surface tilted 11.3 degrees at 0.2 g"><polygon points="50,130 170,130 170,58 50,82" class="water_tb93"></polygon><line x1="38" y1="70" x2="182" y2="70" class="reference_blIf"></line><line x1="38" y1="84.4" x2="182" y2="55.6" class="surface_YS7N"></line><path d="M 50 40 L 50 130 L 170 130 L 170 40" class="cup_kJtk"></path><line x1="42" y1="40" x2="50" y2="40" class="cup_kJtk"></line><line x1="170" y1="40" x2="178" y2="40" class="cup_kJtk"></line><line x1="76" y1="156" x2="144" y2="156" class="arrow_HYBj" marker-end="url(#cup-arrow)"></line><text x="110" y="178" class="arrowLabel_Y7U4">0.2<!-- --> g</text><text x="110" y="26" class="caption_Tm5j">0.20 g</text><text x="186" y="64" class="angle_GrFN">11.3<!-- -->°</text><defs><marker id="cup-arrow" viewBox="0 0 10 10" refX="8" refY="5" markerWidth="5" markerHeight="5" orient="auto-start-reverse"><path d="M 0 0 L 10 5 L 0 10 z" class="arrowHead_oI1R"></path></marker></defs></svg></figure><figure class="cupFigure_LhDN"><svg viewBox="0 0 220 190" class="svg_HLog" role="img" aria-label="0.50 g: water surface tilted 26.6 degrees at 0.5 g"><polygon points="50,130 170,130 170,40 50,100" class="water_tb93"></polygon><line x1="38" y1="70" x2="182" y2="70" class="reference_blIf"></line><line x1="38" y1="106" x2="182" y2="34" class="surface_YS7N"></line><path d="M 50 40 L 50 130 L 170 130 L 170 40" class="cup_kJtk"></path><line x1="42" y1="40" x2="50" y2="40" class="cup_kJtk"></line><line x1="170" y1="40" x2="178" y2="40" class="cup_kJtk"></line><line x1="76" y1="156" x2="144" y2="156" class="arrow_HYBj" marker-end="url(#cup-arrow)"></line><text x="110" y="178" class="arrowLabel_Y7U4">0.5<!-- --> g</text><text x="110" y="26" class="caption_Tm5j">0.50 g</text><text x="186" y="55" class="angle_GrFN">26.6<!-- -->°</text><defs><marker id="cup-arrow" viewBox="0 0 10 10" refX="8" refY="5" markerWidth="5" markerHeight="5" orient="auto-start-reverse"><path d="M 0 0 L 10 5 L 0 10 z" class="arrowHead_oI1R"></path></marker></defs></svg></figure></div>
<p>The dashed line is where the surface sits at rest; the gold line is where it
sits under cornering. That gives you a direct readout:</p>
<table><thead><tr><th>Lateral acceleration</th><th>Water surface tilts</th></tr></thead><tbody><tr><td>0.05 g</td><td>2.9°</td></tr><tr><td>0.10 g</td><td>5.7°</td></tr><tr><td>0.20 g</td><td>11.3°</td></tr><tr><td>0.30 g</td><td>16.7°</td></tr><tr><td>0.50 g</td><td>26.6°</td></tr><tr><td>1.00 g</td><td>45°</td></tr></tbody></table>
<p>The cup isn't a vague indicator of niceness. It's an accelerometer with a
tilt display.</p>
<h2 class="anchor anchorTargetStickyNavbar_Vzrq" id="why-its-harder-than-it-sounds">Why it's harder than it sounds<a href="https://docs.kamoji.bot/blog/cup-of-water-test#why-its-harder-than-it-sounds" class="hash-link" aria-label="Direct link to Why it's harder than it sounds" title="Direct link to Why it's harder than it sounds" translate="no">​</a></h2>
<p>Whether you spill depends on the cup as much as the driving. The surface
pivots about the centre, so the water climbs by <code>r × tan(θ)</code> at the outer
edge, where <code>r</code> is the cup's radius. It goes over the side when that climb
exceeds the freeboard — the gap between the water and the rim.</p>
<p>For a cup about 8 cm across:</p>
<table><thead><tr><th>Gap to the rim</th><th>Spills above</th></tr></thead><tbody><tr><td>0.5 cm</td><td>0.12 g</td></tr><tr><td>1.0 cm</td><td>0.25 g</td></tr><tr><td>2.0 cm</td><td>0.50 g</td></tr><tr><td>3.0 cm</td><td>0.75 g</td></tr></tbody></table>
<p>Fill it to the brim and you're being graded at around a tenth of a g, which
is stricter than most people drive on a motorway slip road. Leave a couple
of centimetres and you have room for genuinely brisk cornering.</p>
<p>Here is the same corner — the same 0.30 g — in three cups filled to different
levels:</p>
<div class="row_FWvn"><figure class="cupFigure_LhDN"><svg viewBox="0 0 220 190" class="svg_HLog" role="img" aria-label="Filled high: water surface tilted 16.7 degrees at 0.3 g"><polygon points="50,130 170,130 170,40 50,66" class="water_tb93"></polygon><line x1="38" y1="48" x2="182" y2="48" class="reference_blIf"></line><line x1="38" y1="69.6" x2="182" y2="26.400000000000002" class="surface_YS7N"></line><path d="M 50 40 L 50 130 L 170 130 L 170 40" class="cup_kJtk"></path><line x1="42" y1="40" x2="50" y2="40" class="cup_kJtk"></line><line x1="170" y1="40" x2="178" y2="40" class="cup_kJtk"></line><line x1="76" y1="156" x2="144" y2="156" class="arrow_HYBj" marker-end="url(#cup-arrow)"></line><text x="110" y="178" class="arrowLabel_Y7U4">0.3<!-- --> g</text><text x="110" y="26" class="caption_Tm5j">Filled high</text><text x="186" y="39" class="angle_GrFN">16.7<!-- -->°</text><defs><marker id="cup-arrow" viewBox="0 0 10 10" refX="8" refY="5" markerWidth="5" markerHeight="5" orient="auto-start-reverse"><path d="M 0 0 L 10 5 L 0 10 z" class="arrowHead_oI1R"></path></marker></defs></svg><figcaption class="spilt_p_8m">spills</figcaption></figure><figure class="cupFigure_LhDN"><svg viewBox="0 0 220 190" class="svg_HLog" role="img" aria-label="Filled mid: water surface tilted 16.7 degrees at 0.3 g"><polygon points="50,130 170,130 170,52 50,88" class="water_tb93"></polygon><line x1="38" y1="70" x2="182" y2="70" class="reference_blIf"></line><line x1="38" y1="91.6" x2="182" y2="48.400000000000006" class="surface_YS7N"></line><path d="M 50 40 L 50 130 L 170 130 L 170 40" class="cup_kJtk"></path><line x1="42" y1="40" x2="50" y2="40" class="cup_kJtk"></line><line x1="170" y1="40" x2="178" y2="40" class="cup_kJtk"></line><line x1="76" y1="156" x2="144" y2="156" class="arrow_HYBj" marker-end="url(#cup-arrow)"></line><text x="110" y="178" class="arrowLabel_Y7U4">0.3<!-- --> g</text><text x="110" y="26" class="caption_Tm5j">Filled mid</text><text x="186" y="61" class="angle_GrFN">16.7<!-- -->°</text><defs><marker id="cup-arrow" viewBox="0 0 10 10" refX="8" refY="5" markerWidth="5" markerHeight="5" orient="auto-start-reverse"><path d="M 0 0 L 10 5 L 0 10 z" class="arrowHead_oI1R"></path></marker></defs></svg></figure><figure class="cupFigure_LhDN"><svg viewBox="0 0 220 190" class="svg_HLog" role="img" aria-label="Filled low: water surface tilted 16.7 degrees at 0.3 g"><polygon points="50,130 170,130 170,74 50,110" class="water_tb93"></polygon><line x1="38" y1="92" x2="182" y2="92" class="reference_blIf"></line><line x1="38" y1="113.6" x2="182" y2="70.4" class="surface_YS7N"></line><path d="M 50 40 L 50 130 L 170 130 L 170 40" class="cup_kJtk"></path><line x1="42" y1="40" x2="50" y2="40" class="cup_kJtk"></line><line x1="170" y1="40" x2="178" y2="40" class="cup_kJtk"></line><line x1="76" y1="156" x2="144" y2="156" class="arrow_HYBj" marker-end="url(#cup-arrow)"></line><text x="110" y="178" class="arrowLabel_Y7U4">0.3<!-- --> g</text><text x="110" y="26" class="caption_Tm5j">Filled low</text><text x="186" y="83" class="angle_GrFN">16.7<!-- -->°</text><defs><marker id="cup-arrow" viewBox="0 0 10 10" refX="8" refY="5" markerWidth="5" markerHeight="5" orient="auto-start-reverse"><path d="M 0 0 L 10 5 L 0 10 z" class="arrowHead_oI1R"></path></marker></defs></svg></figure></div>
<p>This is why "don't spill the cup" is a difficulty dial, not a pass/fail. Bunta
chose the fill level.</p>
<p>One more wrinkle: it's not only about peak g. Water sloshes, and a cup has a
natural sloshing frequency. Two corners taken at the same peak g will produce
very different results depending on how quickly you loaded and unloaded the
car. A slow, deliberate input the water can follow beats a sharp one it can't
— which is exactly the habit the exercise is trying to build.</p>
<h2 class="anchor anchorTargetStickyNavbar_Vzrq" id="driving-to-keep-the-cup-full">Driving to keep the cup full<a href="https://docs.kamoji.bot/blog/cup-of-water-test#driving-to-keep-the-cup-full" class="hash-link" aria-label="Direct link to Driving to keep the cup full" title="Direct link to Driving to keep the cup full" translate="no">​</a></h2>
<p>The technique that keeps water in a cup is the same one that keeps
passengers comfortable and tyres working:</p>
<ul>
<li class=""><strong>Squeeze, don't stab.</strong> Brake and accelerate progressively. Jerk — the
rate of change of acceleration — is what throws the water, not acceleration
itself.</li>
<li class=""><strong>Do one thing at a time.</strong> Finish braking before you turn in. Combining
braking and cornering adds the two forces together diagonally.</li>
<li class=""><strong>Straighten the corner.</strong> A wider, smoother line through a bend needs less
lateral acceleration than a tight one at the same speed.</li>
<li class=""><strong>Look further ahead.</strong> Almost every sharp input is a late reaction to
something you could have seen sooner.</li>
<li class=""><strong>Release as carefully as you apply.</strong> Coming off the brake abruptly
unloads the nose and sloshes the water back the other way.</li>
</ul>
<p>None of this is about going slowly. A smooth driver can be quick. That was
rather the point of Takumi.</p>
<h2 class="anchor anchorTargetStickyNavbar_Vzrq" id="where-kamoji-comes-in">Where Kamoji comes in<a href="https://docs.kamoji.bot/blog/cup-of-water-test#where-kamoji-comes-in" class="hash-link" aria-label="Direct link to Where Kamoji comes in" title="Direct link to Where Kamoji comes in" translate="no">​</a></h2>
<p>Kamoji reads acceleration with its own sensors, so it can show you how many g
the car is pulling in real time — and it runs Takumi's Cup Challenge, the same
test without the mopping up.</p>
<p>You can see both in the <a class="" href="https://docs.kamoji.bot/docs/features">feature reference</a>. Setup is a USB
Type-C cable and nothing else; the <a class="" href="https://docs.kamoji.bot/docs/getting-started">Getting Started</a>
page covers it.</p>
<p>Bunta would probably say the real version builds more character. He's not
wrong. But the water never told anyone what it measured, and Kamoji will.</p>]]></content>
        <author>
            <name>Kamoji Team</name>
            <uri>https://docs.kamoji.bot</uri>
        </author>
        <category label="Driving" term="Driving"/>
        <category label="G-Force" term="G-Force"/>
        <category label="Physics" term="Physics"/>
        <category label="Pop Culture" term="Pop Culture"/>
    </entry>
</feed>